Import documents / files
Written By Stanislas
Last updated 16 days ago
Upload files from your computer to build your knowledge base. Swiftask automatically extracts text from documents using OCR technology, processes them into searchable chunks, and makes them available to AI agents and teammates across your workspace.
Whether you need to upload PDFs, Word documents, spreadsheets, or code files, file import makes it easy to centralize your organization's knowledge in one place. Upload once, use everywhere—across Chat, Agents, and Projects.
Overview
The import documents feature lets you upload files directly from your computer to your knowledge base. Swiftask automatically processes your files—extracting text from images and PDFs using Mistral OCR technology, parsing structured data, and indexing everything for instant AI-powered search and retrieval.
You can upload multiple file types including documents (PDF, DOCX, TXT), spreadsheets (CSV, XLSX), code files (JSON, MD, etc.), and more. Each file is processed, chunked, and stored as a data source that agents and team members can access.
Prerequisites
To import documents to your knowledge base, you need:
A Swiftask account (sign up at swiftask.ai)
Access to the Knowledge section
Files on your computer (supported formats: PDF, DOC, DOCX, PPT, PPTX, XLS, XLSX, CSV, TXT, MD, JSON, code files)
Permission to create data sources in your workspace
File import is available to all Swiftask users.
Supported file types
Swiftask accepts a wide range of file formats:
Documents: PDF, DOCX, DOC, TXT
Presentations: PPT, PPTX
Spreadsheets: XLSX, XLS, CSV
Data formats: JSON, XML, MD
Code files: Python, JavaScript, and other programming language files
File size: Check your plan limits for maximum file size per upload
Step-by-step guide
1. Navigate to Knowledge
Click Knowledge in the left sidebar. You will see the Knowledge interface with all your data sources and folders.
2. Click the Import button
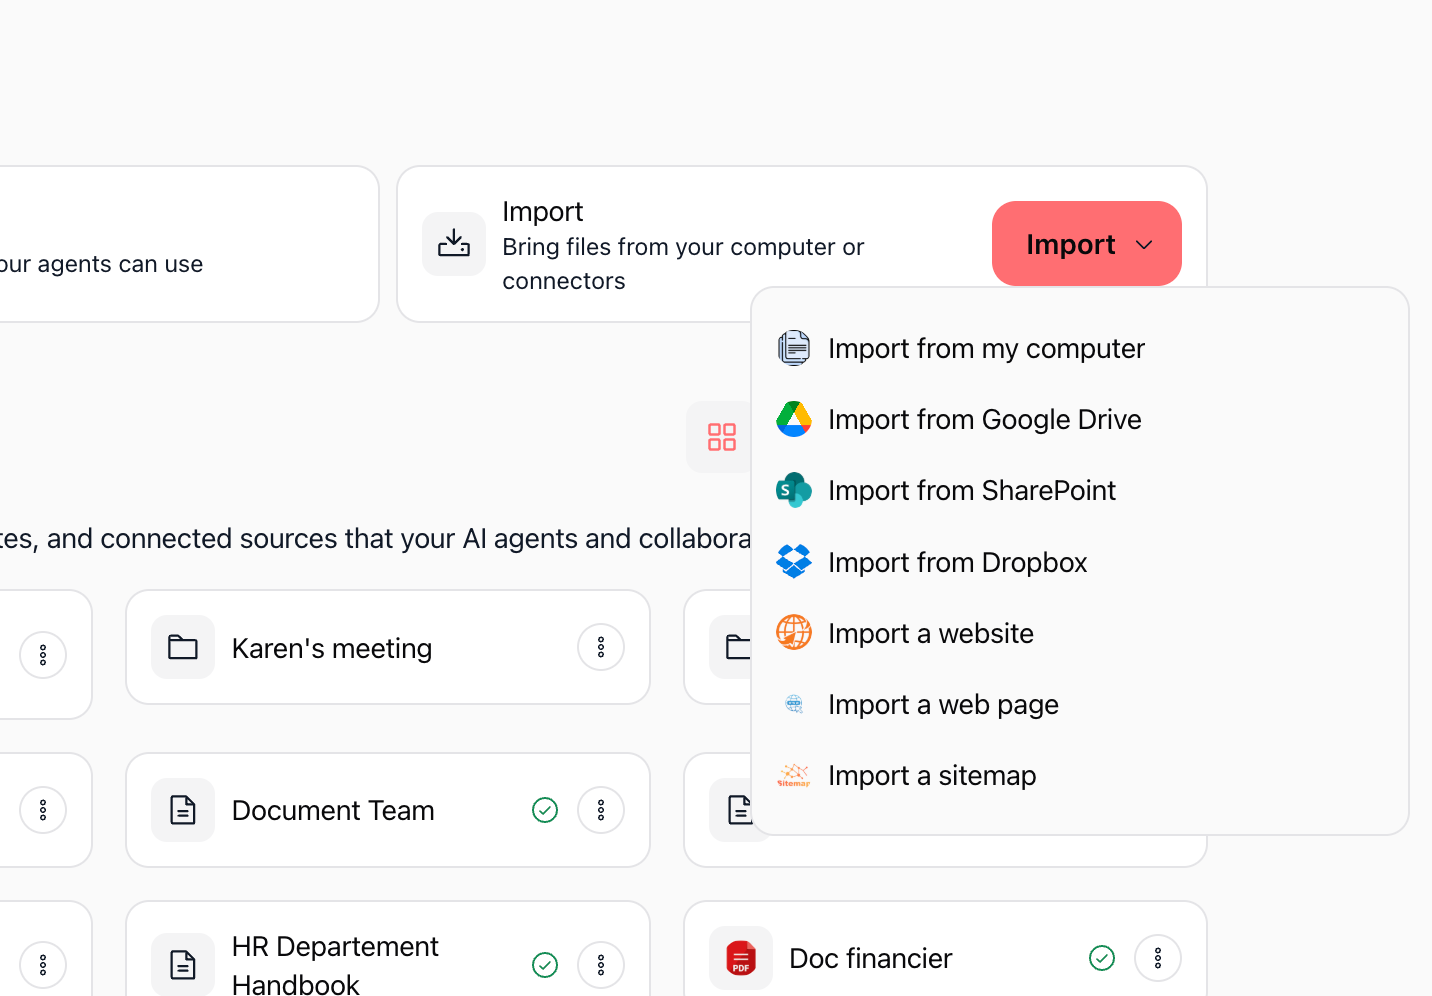
In the Knowledge section, locate and click the red Import button. From the dropdown menu, select Import from my computer to upload files directly from your device.
3. Configure your file import
The file import configuration modal opens. This is where you upload your files and configure how Swiftask processes them.
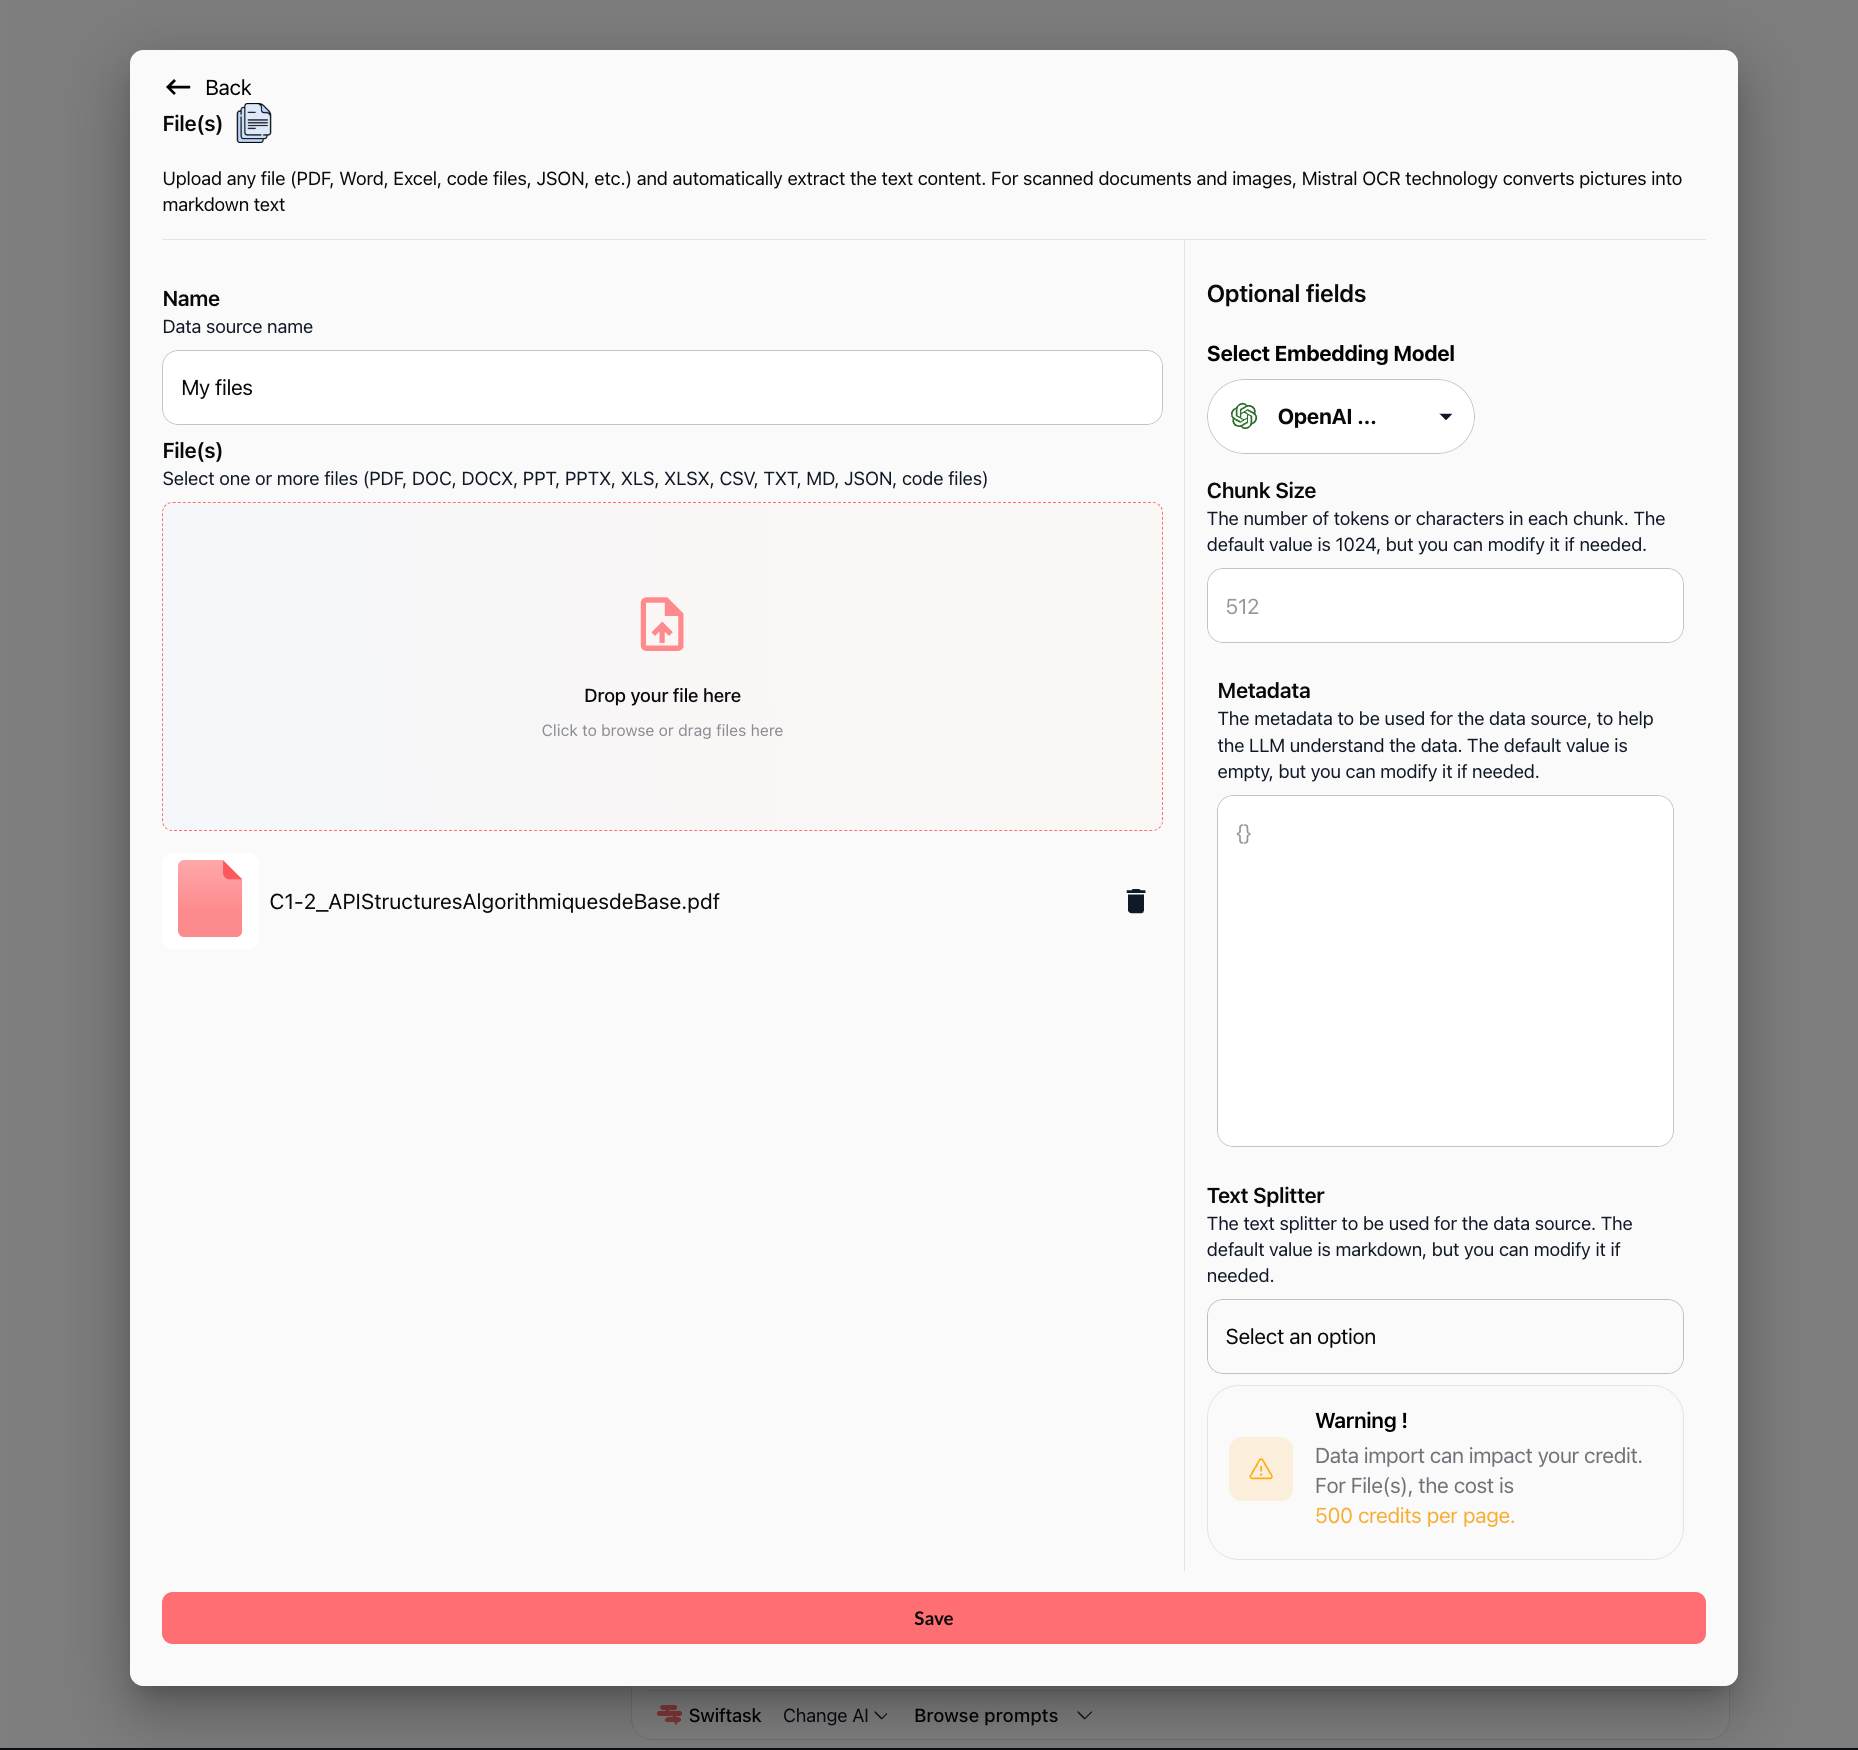
The configuration screen is divided into two sections:
Left section: File upload
Name – Enter a descriptive name for your data source (e.g., "My files").
File(s) – Drop your files into the designated area or click to browse. You can upload multiple files at once. Uploaded files appear with their filename and a trash icon to remove them if needed.
OCR Notice – Swiftask uses Mistral OCR technology to automatically convert scanned documents and pictures into markdown text.
Right section: Optional fields
Select Embedding Model – Choose the AI model used to create vector embeddings (default: OpenAI Text Embedding 3 Small).
Chunk Size – Set the number of tokens or characters per chunk. The default is 512, which can be modified according to your retrieval needs.
Metadata – Add custom metadata in JSON format to provide extra context to the language model.
Text Splitter – Select the splitting method (the default value is markdown).
Warning notice – Shows the credit consumption for file imports (e.g., 500 credits per page).
4. Upload your files
You can add files using either method:
Drag and drop: Drag files from your computer directly into the Drop your file here box.
Browse: Click Click to browse or drag files here and select files from your file explorer.
5. Configure optional settings (if needed)
Embedding model: Leave the default (OpenAI Text Embedding 3 Small) unless you have specific requirements.
Chunk size: Keep the default (512) for most use cases. Adjust only if you need more granular or broader context retrieval.
Metadata: Add custom metadata if you want to provide additional context to the AI. For example:
{ "department": "HR", "year": "2026", "document_type": "policy" }Text splitter: Keep the default (markdown) unless your document requires a specific splitting method.
6. Save and process
Once your files are uploaded and configured, click the Save button at the bottom of the screen.
Swiftask processes your files in the background:
Text is extracted from PDFs and images using OCR
Content is split into chunks based on your chunk size setting
Chunks are embedded using the selected embedding model
The data source is indexed and made searchable
You'll see a progress indicator. Once complete, your data source appears in the Knowledge section.
7. View your imported documents (Content tab)
Click on your data source from the Knowledge list to open its dashboard. The default Content tab displays all indexed files and extraction logs.
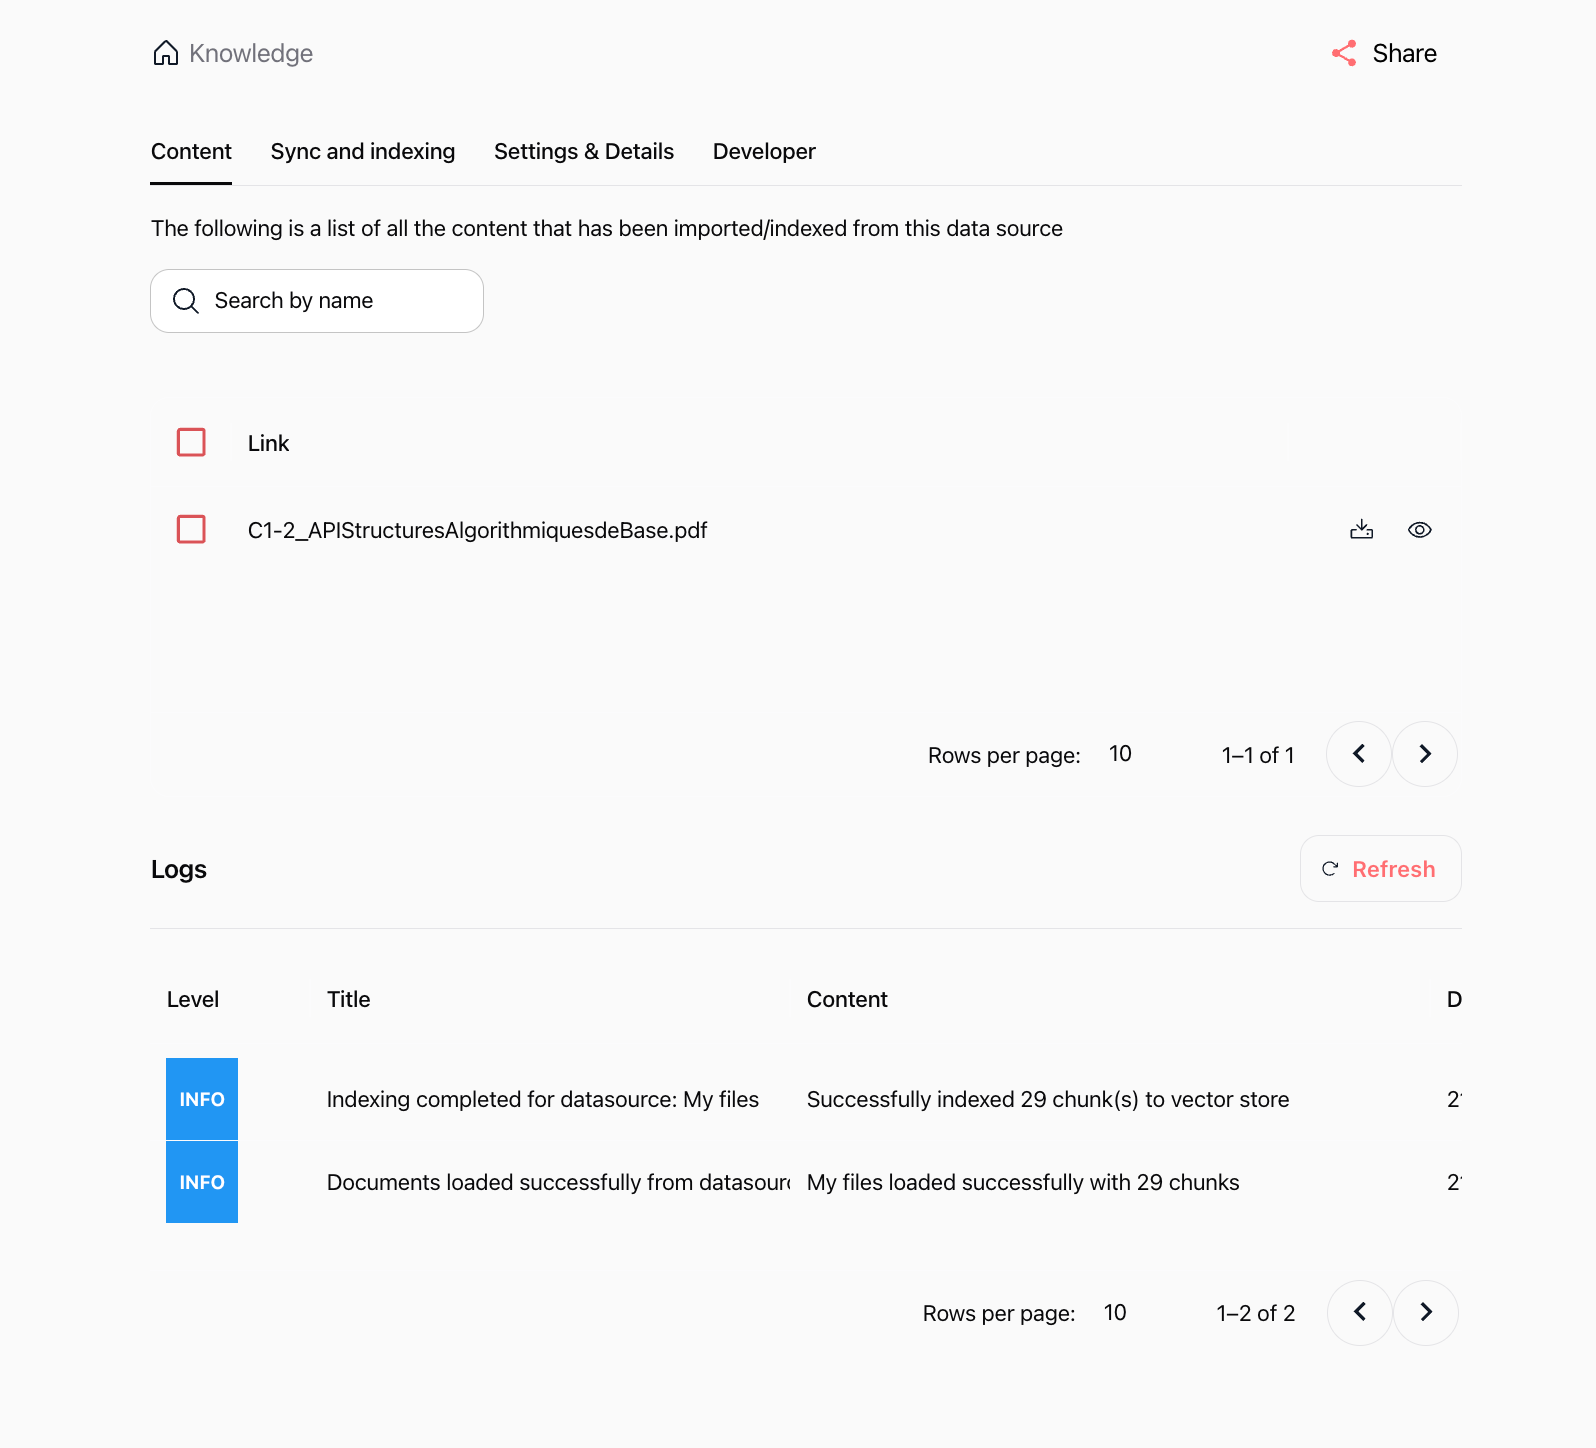
On this tab, you can:
Search files: Use the Search by name bar to filter files quickly.
Manage files: Select files using the checkbox, download the source file, or click the eye icon to preview the extracted chunk structure.
Review Logs: The bottom panel displays real-time processing logs with log Level (
INFO), Title, Content (e.g., number of chunks indexed), and a Refresh button.
8. Monitor synchronization and indexing (Sync and indexing tab)
Click the Sync and indexing tab to check processing status and configure automatic updates.
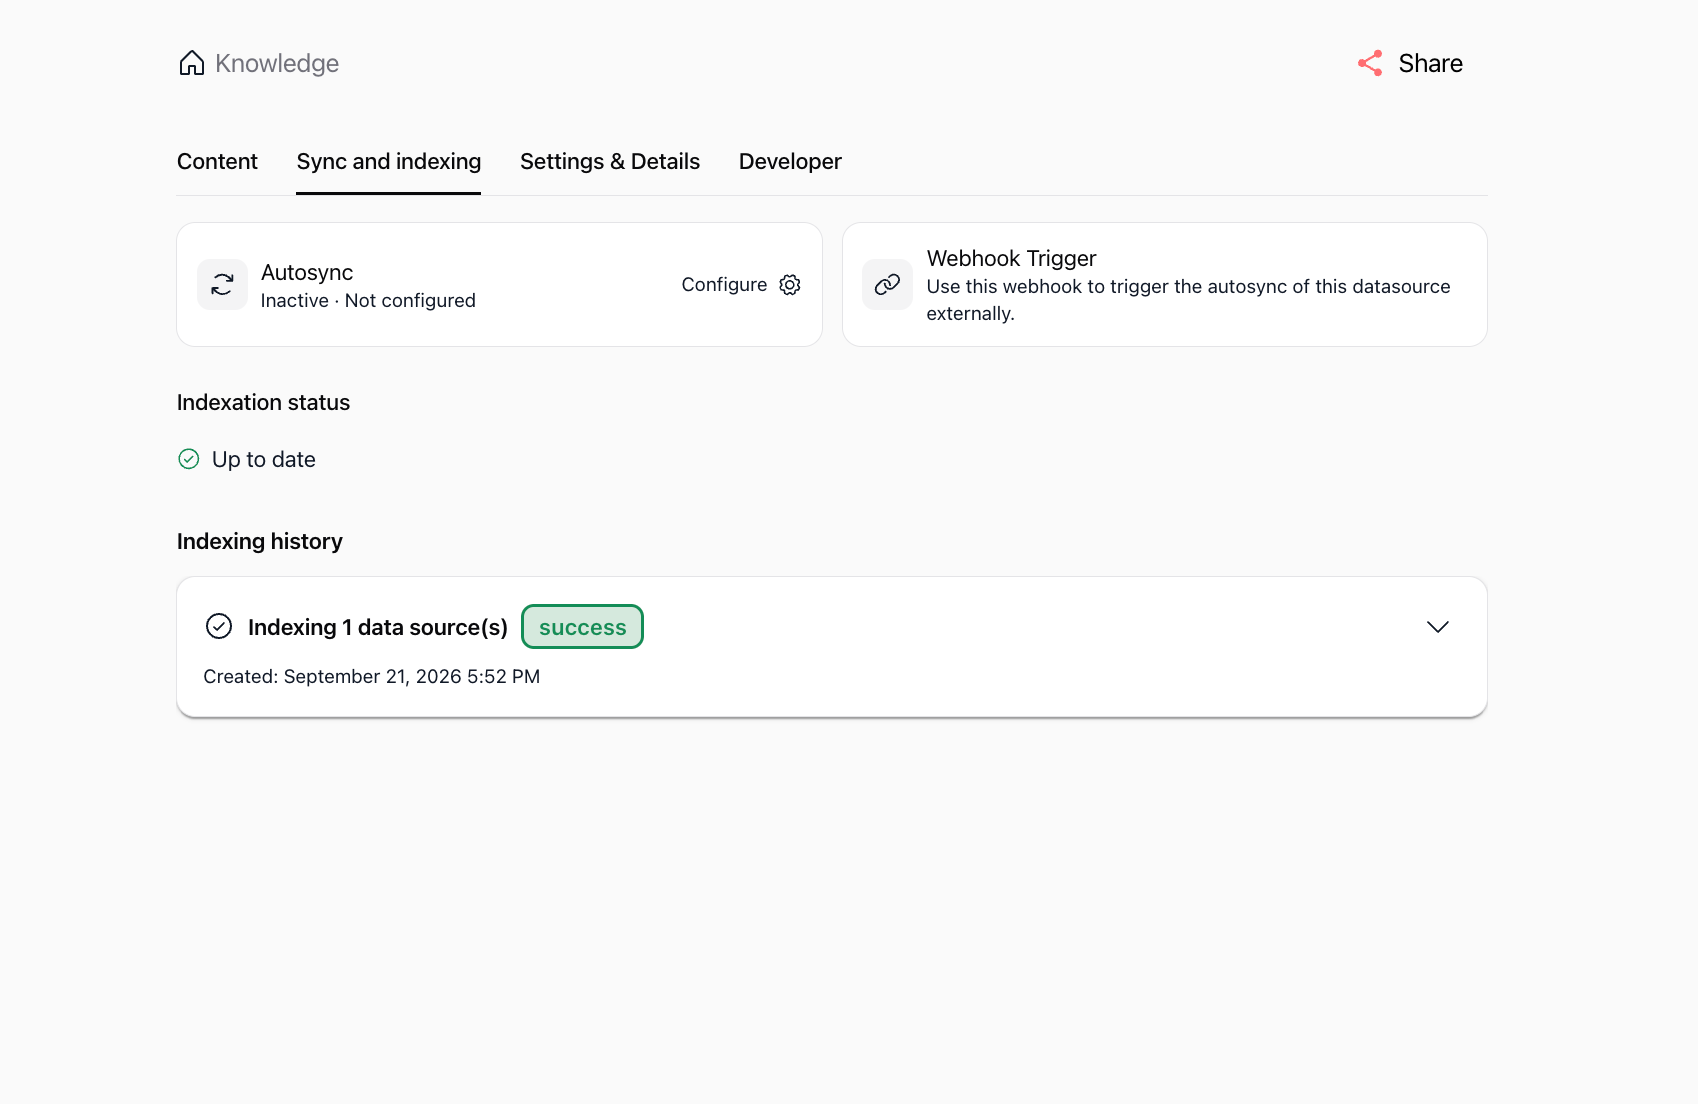
This tab includes:
Autosync: Configure automated synchronization schedules for your data source.
Webhook Trigger: Use a dedicated webhook URL to trigger re-indexing externally from your own workflows.
Indexation status: Displays the current status (e.g., Up to date).
Indexing history: Shows past indexing runs with execution timestamps and result badges (e.g.,
success).
9. Manage settings and organization (Settings & Details tab)
Click the Settings & Details tab to manage data source configuration, folder hierarchy, and sharing permissions.
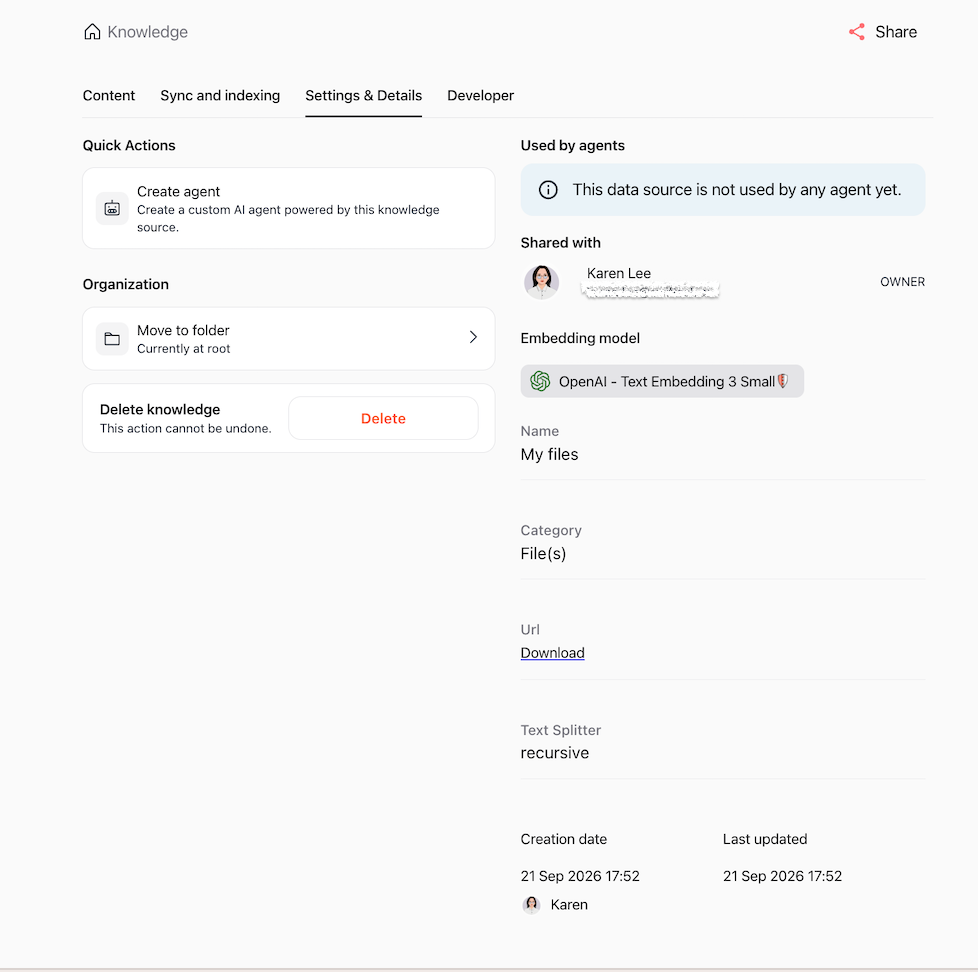
Available options include:
Quick Actions: Click Create agent to immediately generate an AI agent connected to this data source.
Organization: Click Move to folder to organize the data source within your Knowledge folder structure.
Delete knowledge: Permanently remove the data source and its indexed vectors.
Metadata panel: Displays connected agents, access permissions (Shared with), embedding model, category, source download URL, text splitter type, and creation/update dates.
10. Connect via API (Developer tab)
Click the Developer tab to integrate this data source with external systems programmatically.
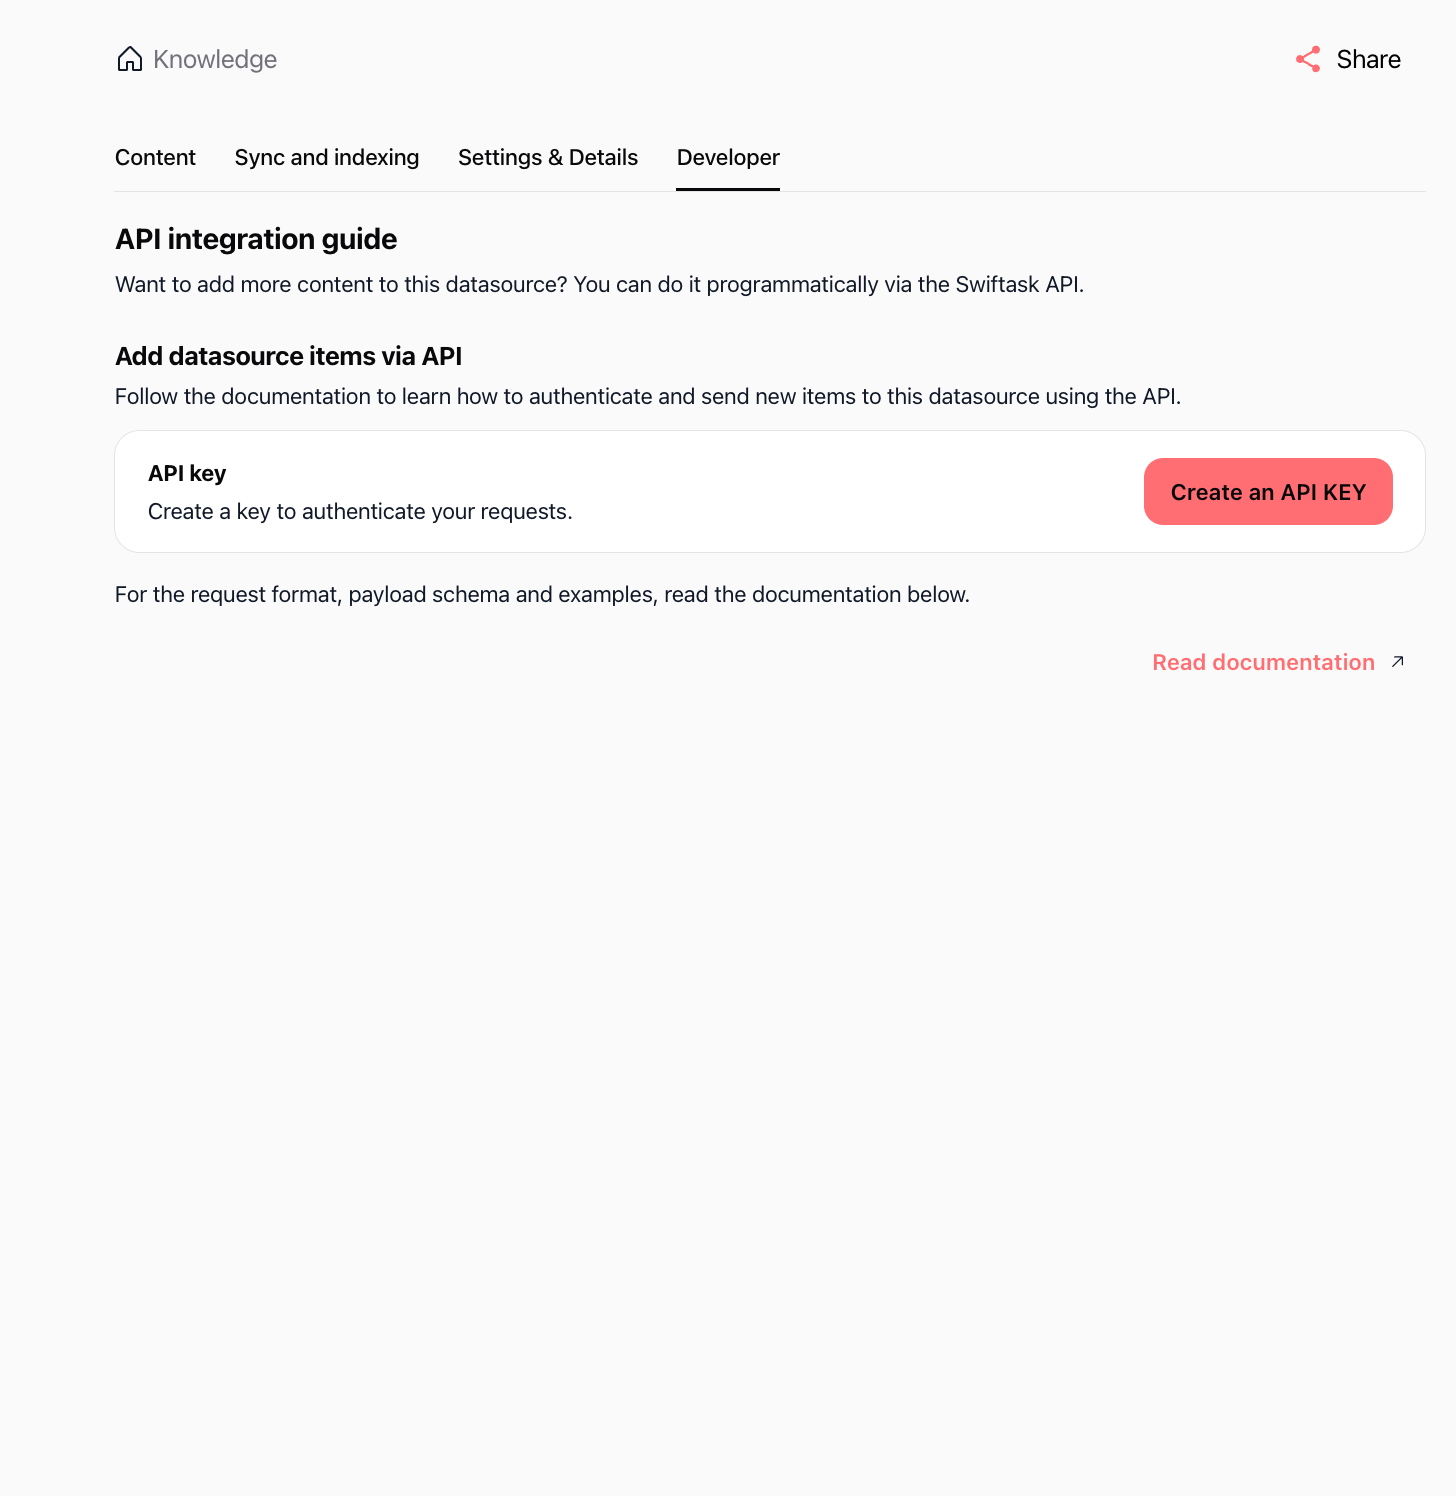
This section allows you to:
API integration guide: Follow instructions to add new items to the data source programmatically.
API key: Click Create an API KEY to generate an authentication token.
Read documentation: Access the full Swiftask developer API reference.
How file processing works
Automatic OCR and text extraction
When you upload a PDF or image, Swiftask automatically extracts text using Mistral OCR technology. This means:
PDFs: All text content is extracted, whether the PDF is text-based or scanned
Images: Text embedded in screenshots, photos, or scanned documents is automatically extracted
No manual steps needed: Extraction happens automatically in the background
Document parsing
Swiftask parses your files to understand their structure and content:
Documents (DOCX, TXT, PDF): Text is extracted and analyzed
Spreadsheets (CSV, XLSX): Rows, columns, and data relationships are recognized
Data files (JSON, XML): Structured data is parsed and made available for queries
Code files: Code structure and syntax are preserved
Chunking and embedding
Your documents are split into chunks and converted into vector embeddings:
Chunking: Content is divided into smaller pieces based on your chunk size setting (default: 512 tokens)
Embedding: Each chunk is converted into a vector representation using the selected embedding model
Indexing: Vectors are stored in a searchable database that agents can query
Practical use cases
Build an HR knowledge base
Upload employee handbooks, policies, and benefits documentation. Create an HR agent that answers employee questions using your actual policies.
Centralize product documentation
Upload product manuals, troubleshooting guides, and FAQs. Build a technical support agent that provides accurate answers based on your documentation.
Organize research and reports
Upload market research, competitor analysis, and internal reports. Create a research agent that analyzes data and extracts insights.
Store legal and compliance documents
Upload contracts, compliance guidelines, and legal policies. Build an agent that references specific clauses and regulations.
Tips & best practices
Use descriptive names: Name your data sources clearly so you can identify them later. Instead of "Document 1," use "HR Hiring Standards 2026" or "Product Manual v3.2."
Organize with folders: Group related documents in folders to keep your knowledge base organized.
Keep chunk size at default (512): The default chunk size works well for most use cases. Adjust only if you have specific retrieval needs.
Add metadata for context: Use the metadata field to add context that helps AI understand your documents better.
Update sources regularly: If your documentation changes, re-upload or replace the data source. Outdated information leads to incorrect agent responses.
Test after importing: After importing, test your agents by asking questions that should reference the new content. Verify accuracy.
Troubleshooting
File didn't upload
Cause: File format not supported or file size exceeds limit
Solution:
Check that your file is one of the supported types (PDF, DOCX, XLSX, CSV, TXT, JSON, etc.)
Verify the file is within your plan's size limit
Try again with a different file
Text wasn't extracted correctly
Cause: Poor image quality or corrupted file
Solution:
Ensure scanned documents are clear and high-resolution
Try re-saving the file in a different format
Contact support if the issue persists
Indexing failed
Cause: Processing error or insufficient credits
Solution:
Check your credit balance in Settings → Usage & Billing
Retry the upload
Contact support if the error continues
Agent can't find information
Cause: Content not properly indexed or chunk size too large
Solution:
Verify the indexation status shows "Up to date"
Try reducing chunk size for more granular retrieval
Check that the agent is connected to the correct data source
What happens next
Once you've imported your documents, you're ready to:
Create an agent – Build a custom AI agent powered by your knowledge source
Chat with your data – Use the "Chat with this datasource" feature to instantly query your documents
Share with teammates – Give team members access to your knowledge base
Connect to agents – Link your data source to existing agents to enhance their capabilities
Your documents are now indexed, searchable, and ready to power AI-driven workflows across your workspace.
Additional resources
Knowledge base – Introduction – Learn what knowledge base is and why it matters
Import website and web pages – Add web content to your knowledge base
Import from Google Drive – Sync files from cloud storage
Permissions and access – Control who can see and use your knowledge base
Creating an agent – Build an agent and connect it to your knowledge base
Ready to import your first documents? Click Knowledge in the sidebar, then Import → Import from my computer. Select your files, configure your settings, and let Swiftask handle the rest.
Was this helpful?
Still need help? Ask the team