Attach knowledge from chat
Written By Stanislas
Last updated 16 days ago
Overview
Attach knowledge from chat gives the AI access to your documents, files, or data sources for a single conversation. The AI grounds its answers on the selected sources and includes citations when possible.
Use it when you need a quick, accurate answer based on specific content — a contract, a report, or a webpage — without setting up a full agent. You can attach sources already stored in your workspace Knowledge base, or create a brand-new source on the spot.
Prerequisites
To attach knowledge from chat, you need:
A Swiftask account with access to Chat
Knowledge sources already available in your workspace (optional, if you want to reuse existing content)
The file, URL, or connection details ready if you plan to create a new source
Step-by-step guide
Attach an existing knowledge source
1. Open a chat conversation
Navigate to Chat in Swiftask.
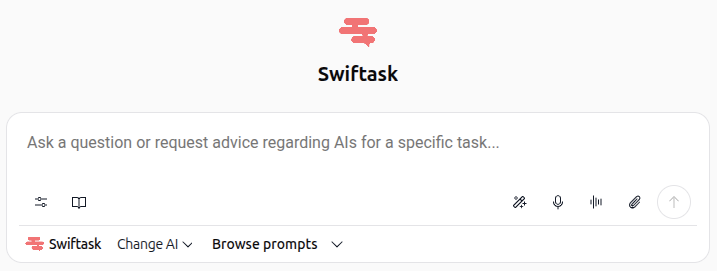
2. Click the book icon
In the input toolbar, click the book icon (next to the skills icon).
3. Review the "Select knowledge sources" modal
The modal opens with a search bar and a Recent list of your available sources, each with a toggle switch.
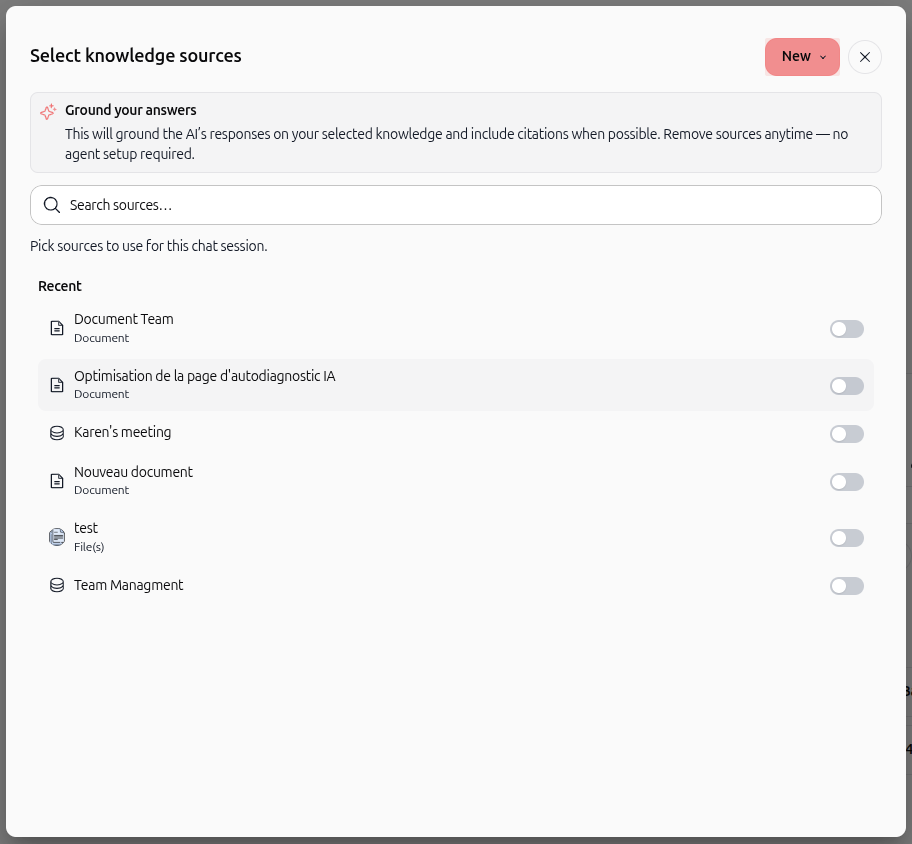
4. Select your sources
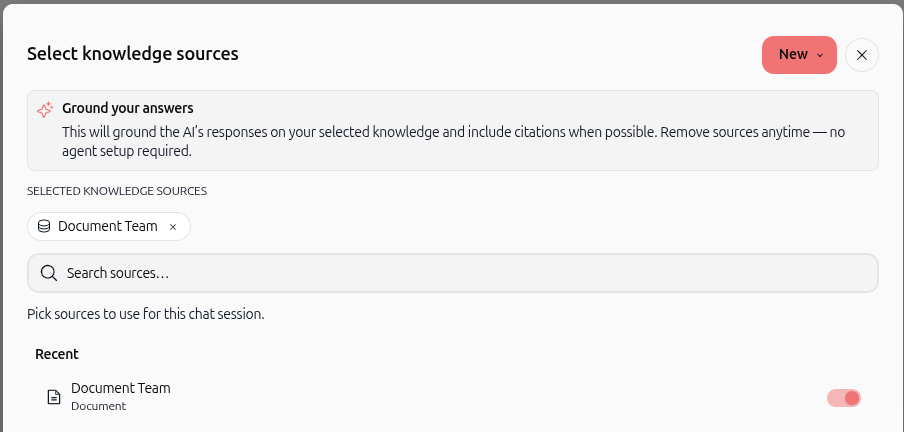
Use the search bar to find a specific source, or browse the Recent list. Toggle on each source you want to use.
Selected sources immediately appear under Selected knowledge sources at the top of the modal with a tag you can remove at any time.
5. Check the attached knowledge indicator
Close the modal. A red dot now appears on the book icon in the chat toolbar to confirm that knowledge sources are active for this chat session.

6. Start chatting
Ask your question. The AI grounds its answer on the selected sources. You can remove any source at any time by reopening the modal and toggling it off.
Create a new knowledge source from chat
1. Click "New" in the modal
In the Select knowledge sources modal, click the New button in the top right corner.
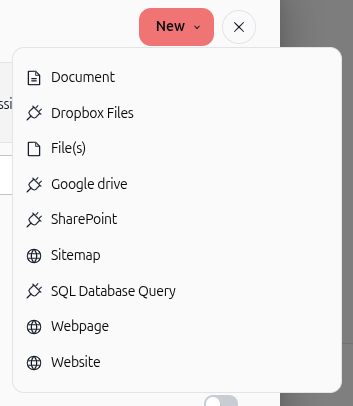
2. Choose a source type
A dropdown opens with the available source types: Document, Dropbox Files, File(s), Google drive, SharePoint, Sitemap, SQL Database Query, Webpage, Website.
3. Configure your source
Select a source type to launch its quick setup flow:
Document – Write a note or reference guide directly in Swiftask.
Dropbox Files – Sync files from your Dropbox account.
File(s) – Upload PDF, DOCX, XLSX, CSV, and other files from your computer.
Google drive – Sync files from your Google Drive.
SharePoint – Sync files from your SharePoint workspace.
Sitemap – Import all pages listed in a sitemap.xml file.
SQL Database Query – Connect and query an SQL database as a knowledge source.
Webpage – Import content from a single web page URL.
Website – Crawl and import an entire website.
4. Save and use it
Once created, the source is indexed, added to your workspace Knowledge base, and automatically available for your current chat session.
Practical use cases
Contract review: Upload a contract as a File(s) source and ask the AI to summarize key clauses, without creating an agent.
Policy lookup: Attach your HR policy document already stored in Knowledge base to get accurate, sourced answers.
Competitive research: Create a Webpage source from a competitor's pricing page and ask the AI to compare it with your offer.
Data lookup: Create a SQL Database Query source to ask questions directly about your business data during a chat.
Tips & best practices
Check the red dot on the book icon to know at a glance whether knowledge is active in your conversation.
Reuse existing sources from the Recent list instead of recreating the same content, to avoid duplicates.
Toggle off sources you no longer need to keep the AI's answers focused.
Give new sources a clear, descriptive name so you can find them easily next time.
Sources created from chat are saved to your workspace Knowledge base — they stay available for future chats and agents.
Troubleshooting
"I can't find my source in the list"
Cause: A search filter is active, or the source isn't shared with you.
Fix: Clear the search bar, or check sharing permissions in the Knowledge base.
"The red dot is not showing on the book icon"
Cause: No sources are currently toggled on.
Fix: Click the book icon, toggle on at least one source, and verify it appears under Selected knowledge sources.
"My new source isn't available right after creation"
Cause: The source is still being indexed.
Fix: Wait for the indexing progress indicator to complete, then toggle the source on.
Additional resources
Create Document – Write notes directly in Swiftask
Import documents / files – Upload files from your computer
Import website / webpage – Add webpage, website, or sitemap content to your knowledge base
Import from Cloud (Google Drive, Dropbox, SharePoint) – Sync files from cloud storage
Introduction to Knowledge base – Learn what Knowledge base is and why it matters
Was this helpful?
Still need help? Ask the team