Create agent from AI Builder
Written By Stanislas
Last updated 16 days ago
Overview
AI Builder is an interactive conversational assistant that creates and configures custom AI agents from natural language prompts. Instead of manually filling out technical configuration forms, you describe your desired outcome, and the assistant sets up the instructions, model parameters, and relevant skills for you.
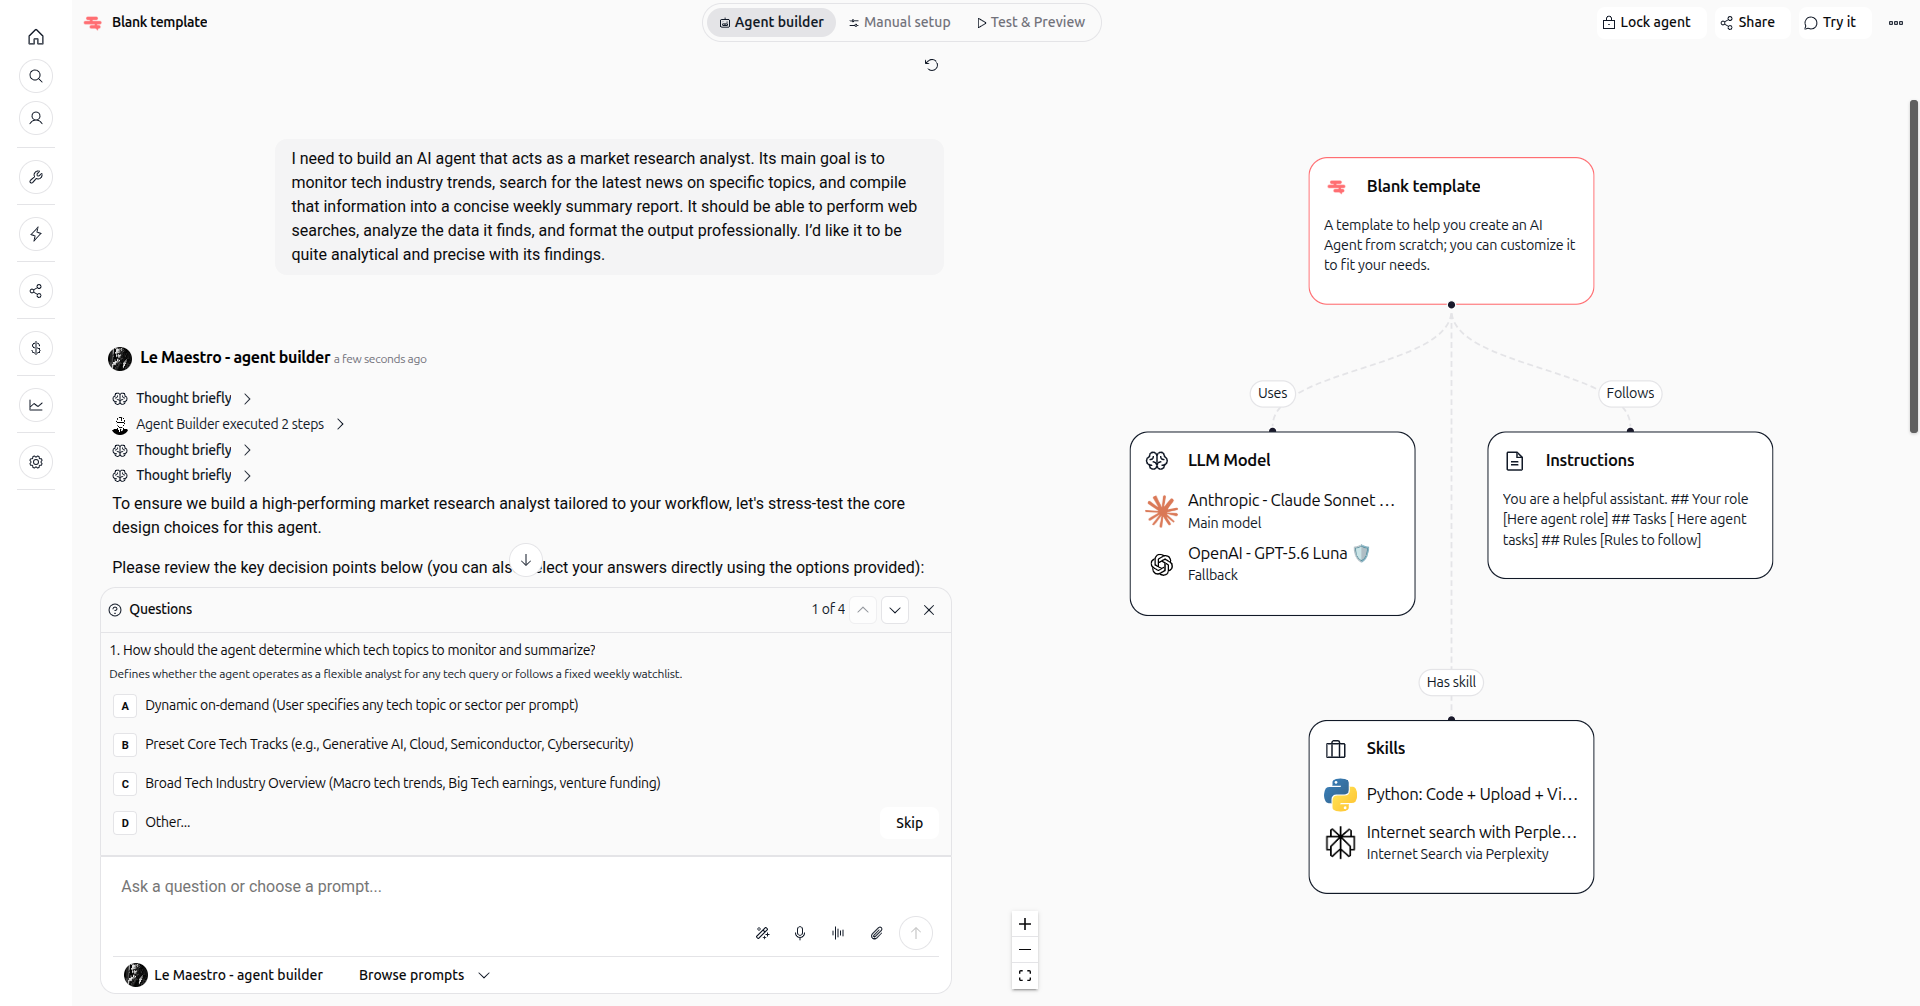
The workspace features a split-screen interface with an AI chat conversation on the left and a dynamic visual node graph on the right. As you answer questions and select recommendations, the graph updates in real time to reflect your agent's live architecture.
When to create an agent via AI Builder
Use AI Builder when you want a fast, assisted setup that optimizes your agent beyond manual configuration:
Discover unexpected tools and integrations: You might not know all the specialized skills available in Swiftask. AI Builder analyzes your objectives and recommends relevant integrations (such as web search indexes, PDF generators, or database connectors) that you might not have known existed.
Find the right LLM model for your constraints: Choosing among dozens of models can be challenging. AI Builder filters and recommends models tailored to your exact requirements, including strict data privacy, European hosting (EU sovereign models), budget efficiency, or deep analytical reasoning.
Rapid prototyping: You want a fully structured agent with tailored system instructions and attached tools within seconds rather than configuring each field manually.
Guided prompt engineering: You know what you want your agent to accomplish, but prefer having an expert assistant craft precise system prompts, operational rules, and guardrails.
Iterative refinement for existing agents: You can reopen any existing agent at any time to add new capabilities, reword instructions, or test adjustments conversationally without manual reconfiguration.
Prerequisites
Before building an agent with AI Builder, ensure you have:
An active Swiftask account with workspace access.
Sufficient AI credits in your workspace, as interacting with the builder consumes credits based on the active assistant model.
Workspace Admin permissions if you want to change the default builder assistant for all workspace members.
Configuring the default AI Builder agent (Workspace admins)
By default, Swiftask provides a specialized public assistant named Le Maestro - agent builder to guide agent creation. Workspace administrators can verify or change this default agent at any time:
Click the Settings gear icon in the lower-left sidebar.
Select Workspace settings.
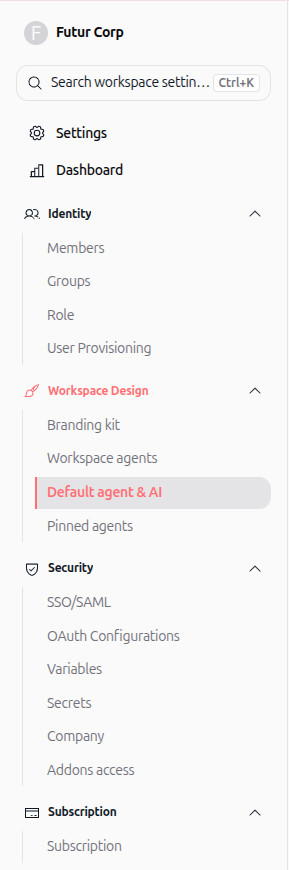
Under the Workspace Design section in the left navigation menu, click Default agent & AI.
Scroll to the bottom to find Agent builder advanced settings and locate Default agent for the agent builder.
Click the edit pencil icon to choose your preferred builder assistant, such as Le Maestro - agent builder or a custom internal agent configured by your team.



Creating a custom AI Builder agent
If your workspace requires specialized agent creation rules, internal guidelines, or restricted tool catalogs, you can build your own custom AI Builder assistant:
Create a new agent from scratch or a template.
In the agent configuration, open the Skills section.
Locate the native Agent Builder skill and click the + button.
In the configuration modal, specify how this assistant should assist in configuring agents, such as internal prompt standards or tool recommendation preferences.
Click Save to attach the skill.
Once saved, go to Workspace settings → Default agent & AI to set your new agent as the workspace builder.


Step-by-step guide
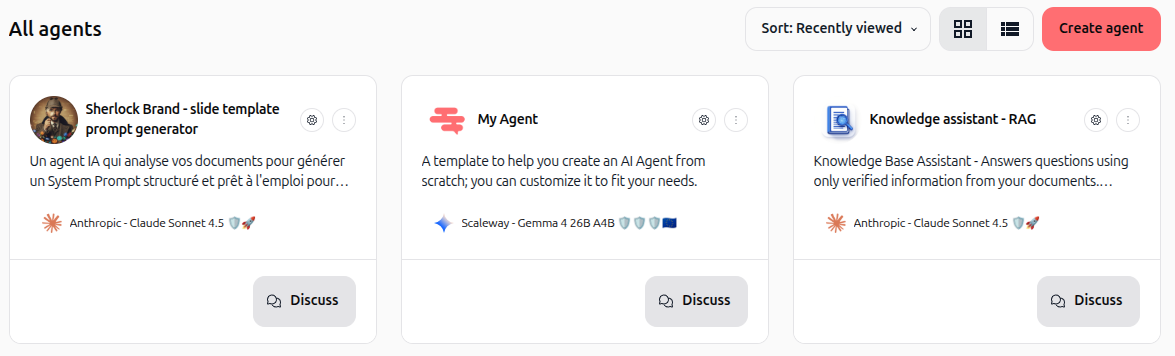
1. Open the agent creation menu
Navigate to the Agents section in the left sidebar navigation. Click the red Create agent button in the upper-right corner.
2. Select create with AI
In the Create a new agent modal, select Create with AI.

3. Describe your agent in plain text
Enter a description of what you want your agent to accomplish in the prompt window. Include details such as the agent's target role, tone, expected tasks, and any compliance or output needs. Click the arrow button to submit.

4. Answer clarifying questions
The assistant initializes your agent and evaluates your request. To tailor the configuration, it may present interactive multiple-choice options or ask targeted clarifying questions in the chat.
Select your preferred option directly from the choice cards or enter custom details in the chat. The visual node graph on the right updates instantly to reflect your decisions.
5. Attach recommended skills
The assistant suggests relevant tools and skills directly in the chat based on your workflow. Click the + button on any recommended skill card to add it to your agent.
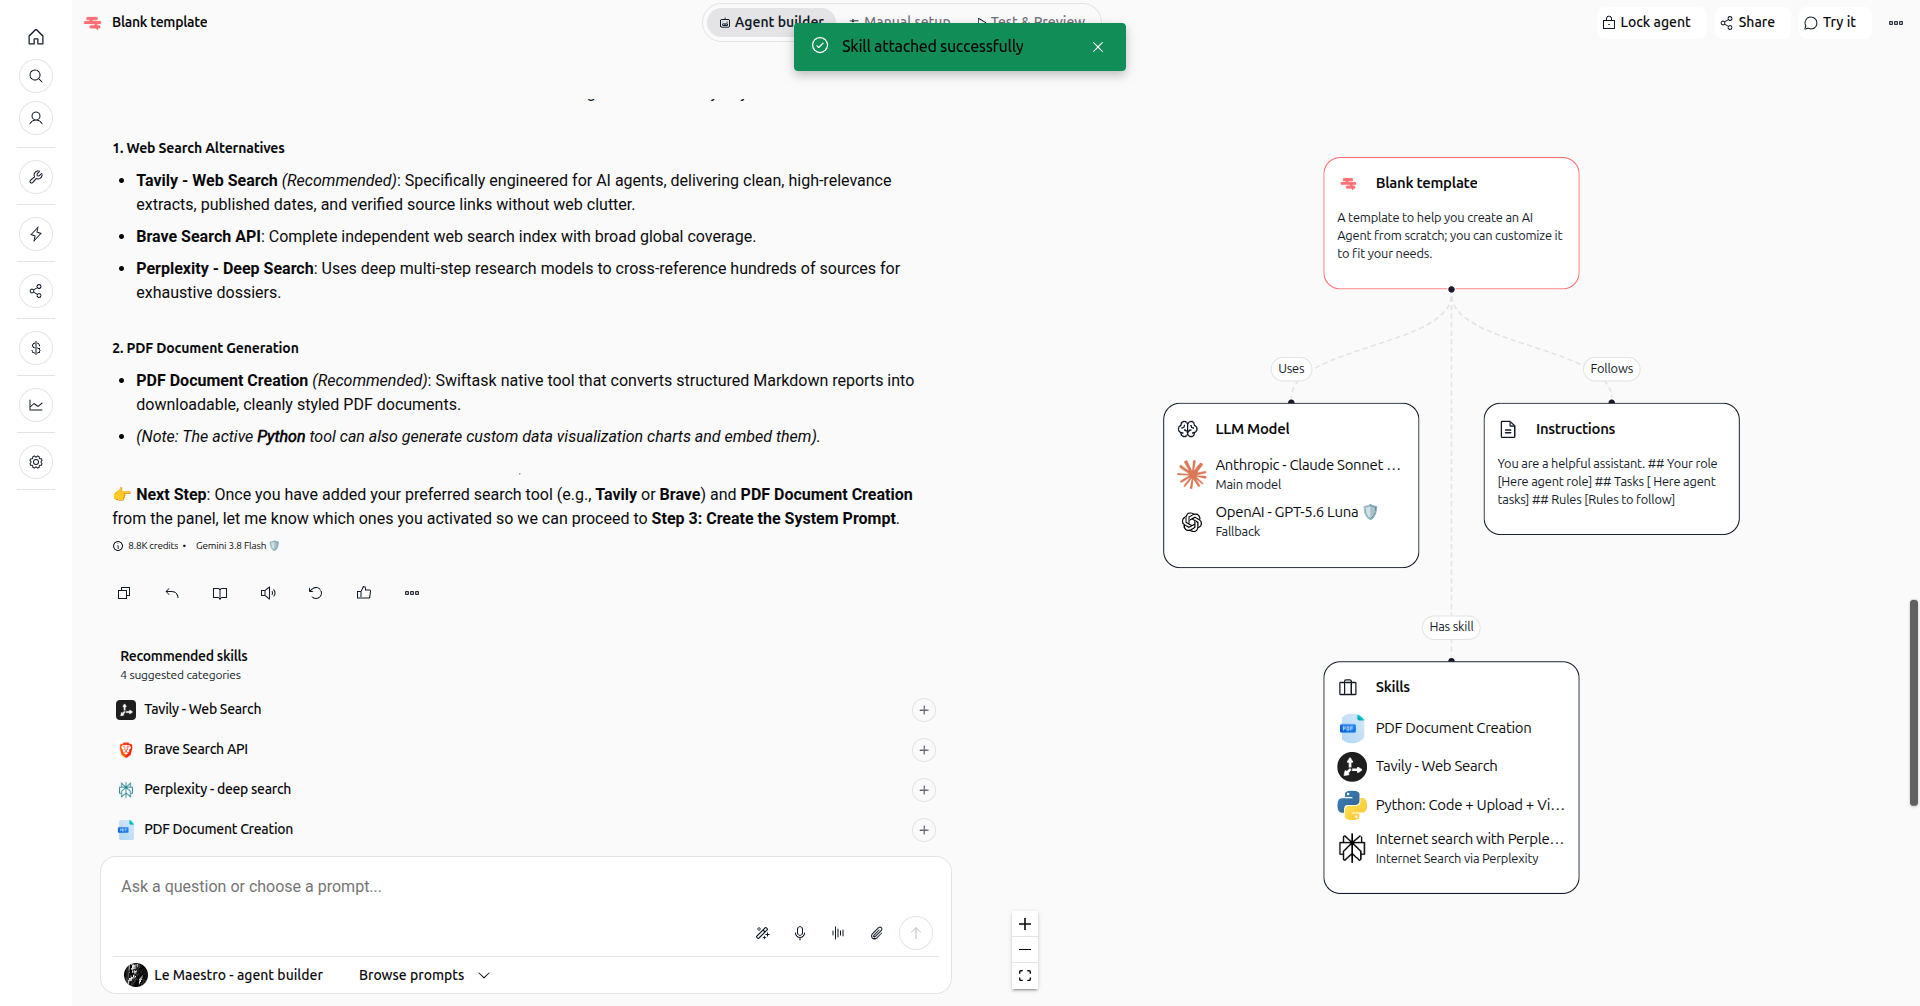
A configuration modal opens with recommended parameters pre-filled. Adjust any settings if necessary and click Save. The skill appears immediately in the visual graph.

6. Select the recommended AI model
The assistant generates a custom profile avatar and presents ranked LLM models matched to your preferences (such as latency, cost, reasoning depth, or European data hosting). Click Use this on a recommended model card to apply it immediately.
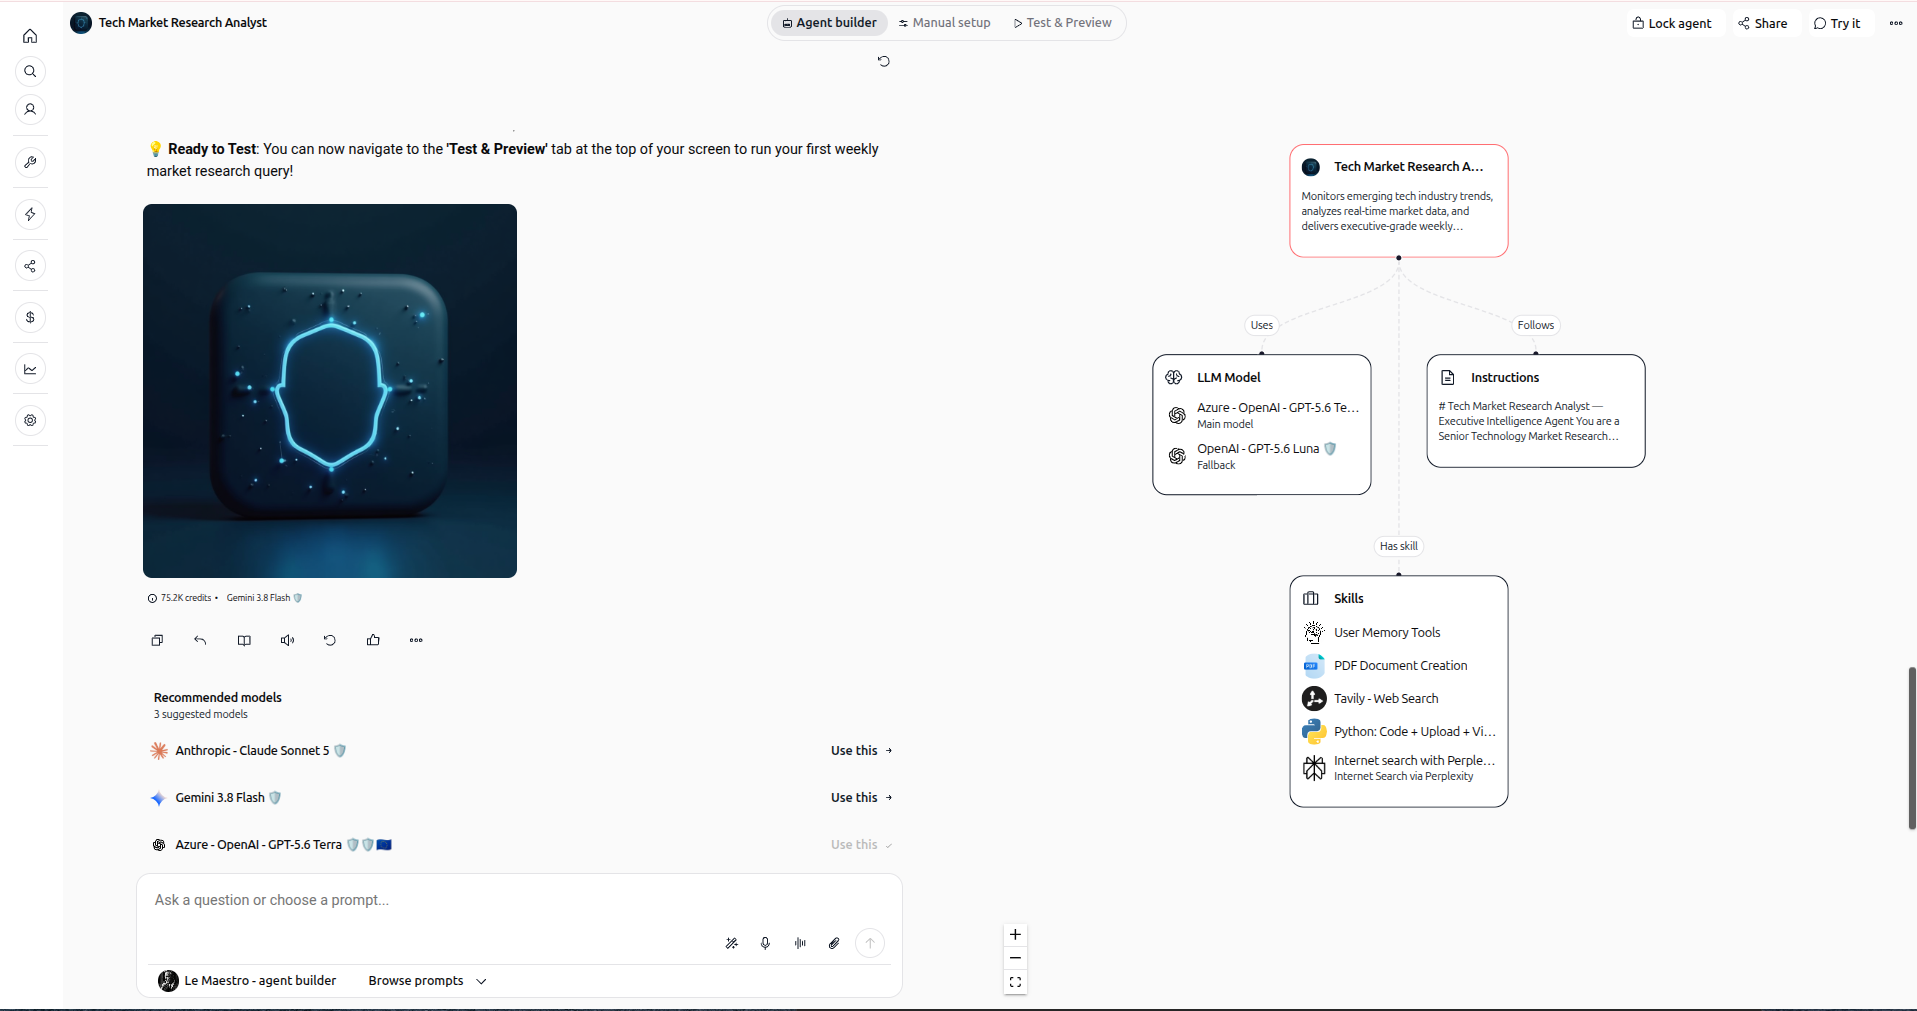
7. Test and preview your agent
Click the Test & Preview tab at the top of the screen to open an execution chat window. Run realistic test prompts to verify how your agent responds and confirm that attached skills trigger as expected.
To refine the agent, return to the Agent builder tab to continue chatting, or switch to Manual setup to make direct adjustments.
Modifying an existing agent with AI Builder
You can use AI Builder at any time to update, expand, or troubleshoot an existing agent:
Open any agent from the Agents list.
Click the Agent builder tab in the top navigation bar.
Chat with the assistant to request updates (e.g., "Add a document generation tool" or "Switch the primary model to an EU-hosted model").
Review the updated visual graph and test the changes in Test & Preview.
Practical use cases
Market research analyst: Instruct the builder to create an agent that gathers tech trends using Tavily or Brave Search, analyzes the findings, and compiles structured weekly intelligence reports into downloadable PDFs.
Privacy-compliant internal assistant: Ask the builder to configure an agent powered by an EU-hosted model that answers employee questions using internal company documentation without sending data outside the region.
Automated customer inquiry handler: Create an agent that reviews incoming inquiries, searches your product documentation, and prepares polite, verified email drafts for review.
Tips & best practices
State your constraints early: Mention privacy requirements (such as GDPR or EU hosting), budget preferences, or specific formats in your first prompt to receive immediate, targeted recommendations.
Monitor the visual graph: Use the live diagram on the right side of the screen to inspect how instructions, models, and skills connect as the assistant updates them.
Combine conversational and manual workflows: Leverage AI Builder for rapid setup and tool discovery, then use Manual setup whenever you need to adjust specific API keys or fine-tune exact prompt rules.
Troubleshooting
Attached skill does not execute during testing
Cause: The skill may require authentication credentials or specific query parameters that were left unconfigured.
Fix: Switch to the Manual setup tab, navigate to the Skills section, and verify that all necessary authentication tokens and parameters are saved.
The agent does not respect specific response rules
Cause: Instructions generated during conversation may be too broad or conflict with default model behaviors.
Fix: Return to the Agent builder tab and ask the assistant to strengthen negative constraints (e.g., "Never make assumptions without consulting the search skill"), or edit the system prompt directly in Manual setup.
Additional resources
Setting objectives and instructions for your agent
Skills (AI tools)
Was this helpful?
Still need help? Ask the team