Share and manage skills
Written By Stanislas
Last updated 16 days ago
Overview
Skill sharing and management in Swiftask allows you to share custom skills across your workspace, assign granular permissions, and track sharing activity.
Instead of recreating tools for each team member, you can build a skill once and make it accessible to individuals or entire departments.
Workspace skills vs. personal skills
Skills in Swiftask are divided into two visibility scopes:
Personal skills: Created by you and private by default. They appear under the Personal tab in your Skills toolkit. Only you can view, edit, or attach them to agents until you explicitly share them.
Workspace skills (Shared with me): Skills shared with you or your groups by teammates. They appear under the Shared with me tab. You can attach and run these skills within agents according to your assigned permission level.
Prerequisites
Before sharing and managing skills, ensure you have:
A Swiftask workspace account with permissions to manage skills (Owner, Admin, or skill creator).
At least one custom skill created in your workspace.
Team members or user groups configured in your workspace to share with.
Step-by-step guide
1. Access the Skills toolkit
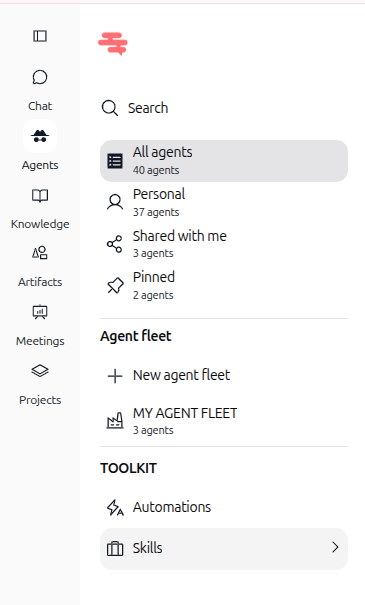
Click Agents in the left sidebar navigation.
In the sidebar under the TOOLKIT section, click Skills.
2. Locate your skill
Select Personal in the left panel to find skills you created, or select Shared with me to view skills shared with you.
Locate the skill you want to share from the list.

3. Open the skill details and start sharing
Click on the skill row to open its Details panel.
Click the Share button in the top-right corner of the panel.

4. Share with individual users and assign roles
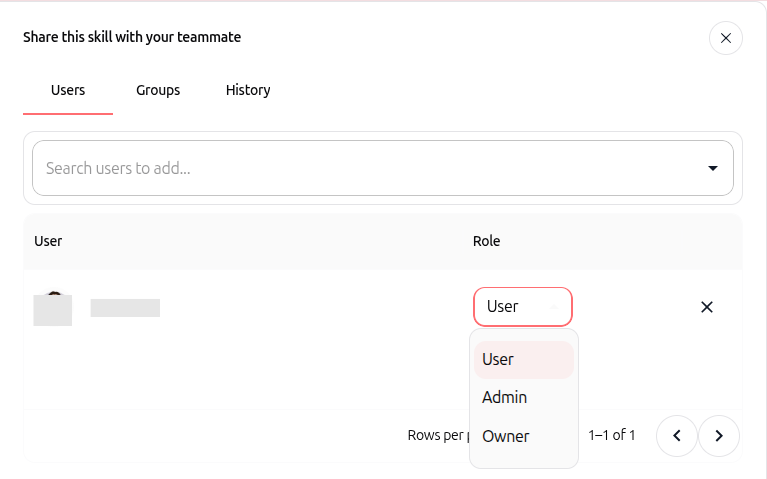
Stay on the Users tab in the sharing modal.
Click Search users to add… and select a teammate from the list.
Click the Role dropdown next to the user to define their access level:
Owner: Full control over the skill. Can edit parameters, manage sharing access, assign roles, and delete the skill.
Admin: Can view and edit the skill configuration, but cannot delete the skill.
User: Can view and attach the skill to agents, but cannot edit its settings or share it.
To remove a user's access, click the X icon next to their name.
5. Share with workspace groups
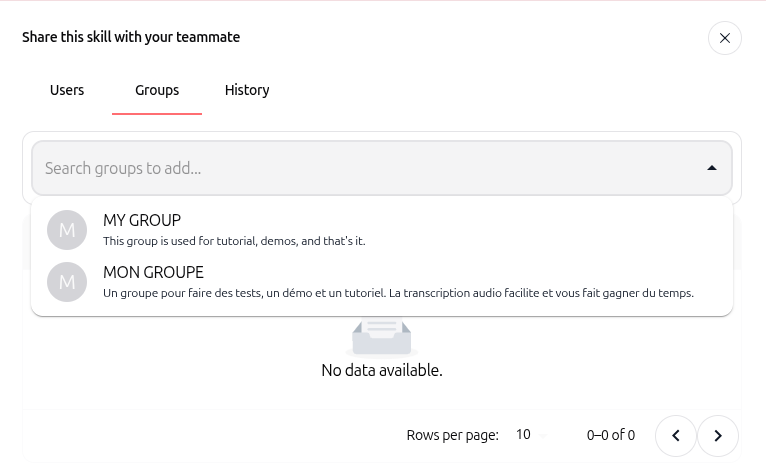
Click the Groups tab in the sharing modal.
Click Search groups to add… and choose the desired team group (such as Marketing or Sales).
All members belonging to the selected group immediately inherit access to the skill based on the assigned role.
6. View sharing history
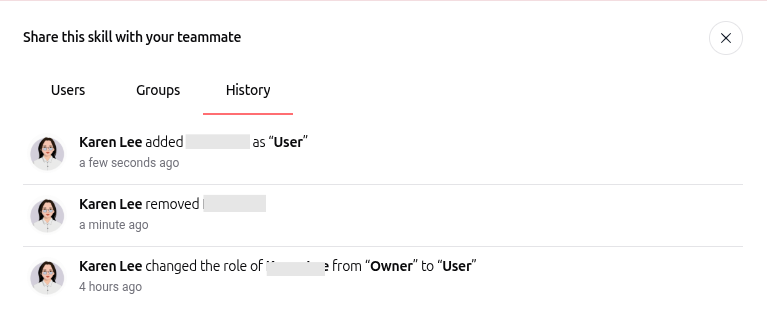
Click the History tab in the sharing modal.
Review the activity log to see who added members, removed access, or modified roles, along with exact timestamps.
Close the modal when finished. All changes apply automatically.
7. Understand the impact of "Require own connection" on shared agents
When an agent with attached skills is shared with teammates, the skill's connection mode dictates how third-party authentications operate:
Shared connection (default): The skill uses a single account authenticated by the workspace admin or skill creator. All teammates interacting with the agent execute actions through that shared workspace account without logging in individually.
Require user's own account (personal connection): The agent shares the skill slot and configuration, but credentials are never shared. When teammates open the agent in chat, they see a Configuration required banner prompting them to connect their personal credentials (e.g., their own Gmail or Outlook account). Every action runs strictly within their personal account permissions.
Practical use cases
Company-wide database query skill
A data engineer creates an internal database querying skill. They share it with the engineering group as User so teammates can attach it to diagnostic agents without risking accidental configuration modifications.
Collaborative skill maintenance
A technical lead builds a custom webhook skill and shares it with project maintainers as Admin. The maintainers can adjust API endpoints and parameters as service URLs evolve.
Recruitment agent with personal email connections
An HR manager builds an agent attached to an email skill set to Require user's own account. When recruiters interact with the shared agent, invitations are sent directly from each recruiter's personal email address.
Tips & best practices
Apply the principle of least privilege: Assign the User role for standard daily use and reserve Admin or Owner for team members who maintain the integration.
Share with groups for simpler onboarding: When new members join a department group, they automatically receive access to all relevant shared skills.
Audit sharing history: Regularly check the History tab to verify who modified permissions or added new collaborators.
Protect private data with personal connections: Always enable Require user's own account when skills access private mailboxes, calendars, or individual cloud storage folders.
Troubleshooting
Teammates cannot find a shared skill in their catalog
Cause: The skill has not been shared with the user or their group, or the user is checking the Personal tab instead of Shared with me.
Fix: Open the skill's Share modal to verify the user or group is listed, and ask the teammate to check under Shared with me.
Teammates cannot edit skill parameters
Cause: The teammate has the User role, which provides read and execution rights only.
Fix: Change the teammate's role to Admin or Owner in the skill's share settings.
Teammates see a "Configuration required" banner when using a shared agent
Cause: The attached skill has Require user's own account enabled.
Fix: This is intended behavior. The teammate must click Configure and authenticate their own external account before using the skill.
Additional resources
Skills (AI tools) – Learn how to browse and configure skills for your agents.
Required own connection: personal connection – Learn how personal connection mode isolates credentials.
Shared connection: one account for the whole workspace – Learn how shared workspace connections work.
Share an agent with workspace members (standard sharing) – Learn how to share AI agents across your organization.
Was this helpful?
Still need help? Ask the team