Agent profile
Written By Stanislas
Last updated 16 days ago
Overview
The Agent profile section defines the primary identity, visual appearance, and interaction settings of an AI agent in Swiftask.
Customizing your agent's profile ensures workspace members and external collaborators immediately recognize the agent's role, understand its scope, and initiate productive conversations with ease.
Prerequisites
Before configuring an agent profile, ensure you have:
An active Swiftask account.
Workspace permissions to create or edit AI agents.
An existing agent created in your workspace.
Step-by-step guide
Step 1: Open the agent profile settings
Navigate to Agents in the left navigation sidebar.
Select the agent you want to modify.
In the left settings panel, click Profile under the search bar.

Step 2: Customize profile photo, name, description, and department
Click the edit pencil icon on the avatar badge to upload a profile photo or icon.
In the Name field, enter a clear, recognizable display name for your agent.
In the Description field, enter a brief overview explaining the agent's purpose and tasks.
In the Departement field, specify the team or business function (e.g., Marketing Specialist, Finance Specialist).

Step 3: Choose the interface layout
Scroll to the Interface layout section.
Open the dropdown menu and choose your preferred view:
Chat: The standard conversational layout focused on prompt exchanges.
Chat + Artifact: A split-screen layout displaying the chat thread on the left and an interactive artifact canvas on the right.

Note: If the Artifact generator tool is added to the agent's skills list, the layout automatically switches to Chat + Artifact to display generated content side-by-side.


Step 4: Set up a welcome message
Scroll down to the Welcome message section.
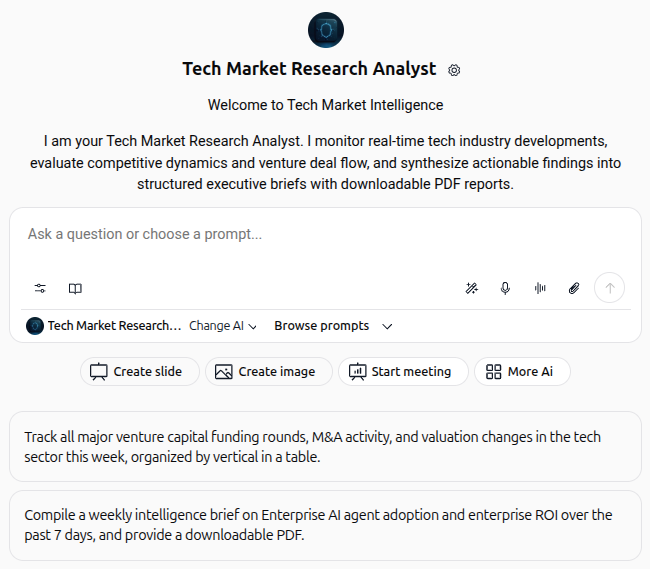
Enter the greeting message displayed to users when opening a new conversation with this agent.
You can also click the microphone icon in the bottom-right corner to dictate the message using voice input.

Step 5: Configure the agent email address
In the Email this Agent section, locate the agent's unique email address (
<slug>@agent.swiftask.ai).Click the copy icon to copy the address to your clipboard for email forwarding or direct messaging.

To modify the email prefix, click the edit pencil icon.
Enter the new address prefix according to the naming rules (lowercase letters, numbers, and hyphens only).
Click Save.

Step 6: Add conversation starters
Scroll to the Conversation Starters section.
Click + Add a new startup question.

Enter a prompt that represents a key task or frequent request for the agent.
Click the checkmark to save the question. Use the edit pencil icon to modify it or the trash icon to delete it.

Step 7: Review agent metadata and preview
Review the metadata at the bottom of the page, including creation date, creator details, supported content types, and shortcut link to the LLM settings page.

Switch to Test & Preview or open the agent in Chat to verify that the avatar, welcome message, and clickable conversation starters appear as expected.
Practical use cases
Market research analyst with live reports
Configure a research agent with the "Chat + Artifact" layout. Starter questions like "Compile a weekly intelligence brief" allow users to generate structured briefs and downloadable documents alongside the conversation.
Inbound email document processing
Assign a dedicated email prefix such as invoices-team to your finance agent. Team members can forward incoming vendor emails and attachments directly to the agent for automated extraction and analysis.
Departmental onboarding assistant
Tag the agent with the "Human Resources" department and configure welcoming starter questions like "What are our leave policies?" or "Give me the onboarding checklist" to support new team members.
Tips & best practices
Use actionable conversation starters: Formulate starters as full, specific instructions (e.g., "Summarize this week's competitor news in a table") rather than short keywords.
Keep email slugs meaningful: Choose recognizable slugs that describe the function (e.g.,
support-tier1orlead-qualifier) to facilitate forwarding rules.Select the appropriate layout early: Choose Chat + Artifact when your agent outputs code, diagrams, or web previews so users immediately see visual results on the split canvas.
Troubleshooting
Cannot save custom email address
Cause: The prefix contains uppercase letters, spaces, or unsupported special symbols.
Fix: Ensure the slug contains only lowercase alphanumeric characters and hyphens (
-).
Conversation starters do not appear in chat
Cause: Starters were not added or were deleted prior to opening the session.
Fix: Return to the Profile settings, verify that questions are listed under Conversation Starters, and reload the preview.
Layout remains split after selecting Chat
Cause: The Artifact generator skill is active on the agent.
Fix: The interface automatically switches to Chat + Artifact whenever this skill is attached to enable real-time artifact previews.
Additional resources
Create agent from scratch – Learn how to initialize a new custom agent.
Instruction (LLM) – Define system prompts, behavioral rules, and model parameters.
Skills / AI tools – Connect tools and integrations to empower your agent.
Was this helpful?
Still need help? Ask the team