Shared connection: one account for the whole workspace
Written By Stanislas
Last updated 16 days ago
Overview
When you connect a third-party account to an agent skill, Swiftask configures the integration in Shared connection mode by default. This means a single account authenticated during setup serves the entire workspace.
With a shared connection, any teammate who interacts with the agent can run the skill without entering their own credentials. This is ideal for company-wide integrations, centralized databases, and shared team tools. In this guide, we use the MCP Connector (connecting to a Zapier MCP server) as our reference example to walk through the complete third-party connection process.
Prerequisites
Before connecting a third-party service with a shared connection, ensure you have:
A Swiftask account with permissions to create or edit agents.
Access to the third-party platform or service (for example, Zapier, Notion, or your custom server).
Your connection endpoint URL (such as
https://mcp.zapier.com/api/v1/connectfor an MCP server).The necessary authentication credentials (OAuth access, Bearer token, or API key) from your external account settings.
Step-by-step guide
1. Open agent skills and select your connector
Go to Agents in the left navigation menu and select your agent.
Click the configuration icon to open the configuration panel.
Click Skills in the left menu.
Locate your desired tool in the catalog and click Add. (We select MCP Connector as our example).

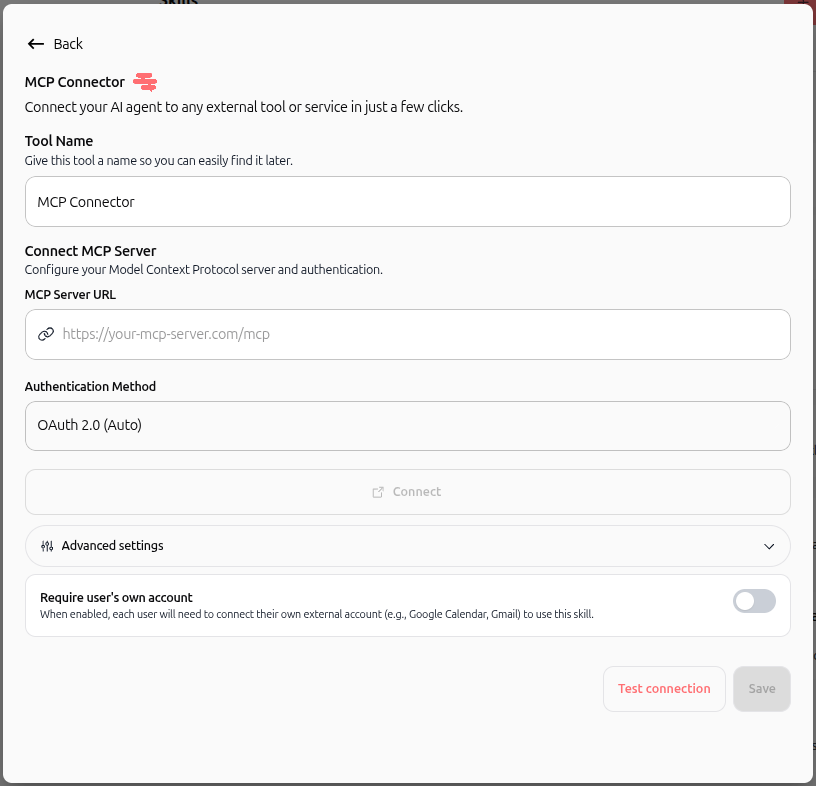
2. Configure tool details and server URL
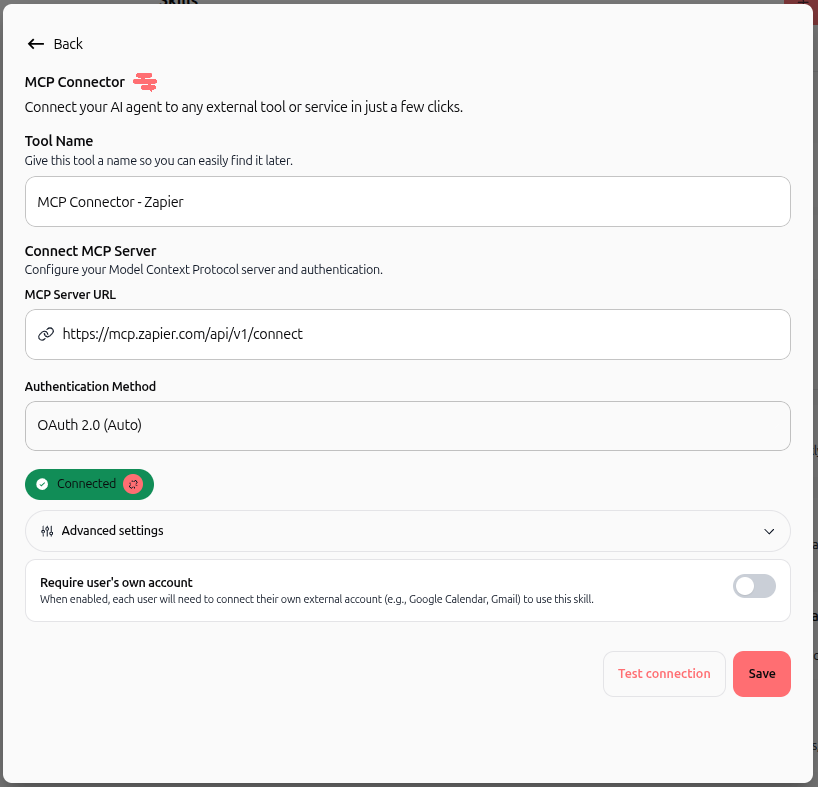
Enter a clear identifier in the Tool Name field (for example,
MCP Connector - Zapier).In the MCP Server URL field, enter your service endpoint URL (for example,
https://mcp.zapier.com/api/v1/connect).
3. Select an authentication method
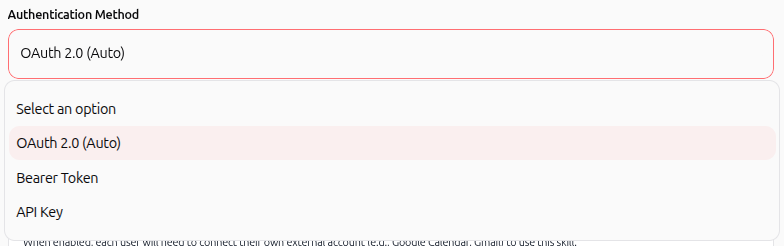
Click the Authentication Method dropdown and select the authentication scheme supported by your external service:
OAuth 2.0 (Auto): Swiftask automatically redirects to the provider to authorize access.
Bearer Token: An authorization token obtained from your external provider's developer or account settings.
API Key: A permanent secret key provided by your third-party account.
4. Authenticate your third-party account
Complete the authentication flow according to your selected method:
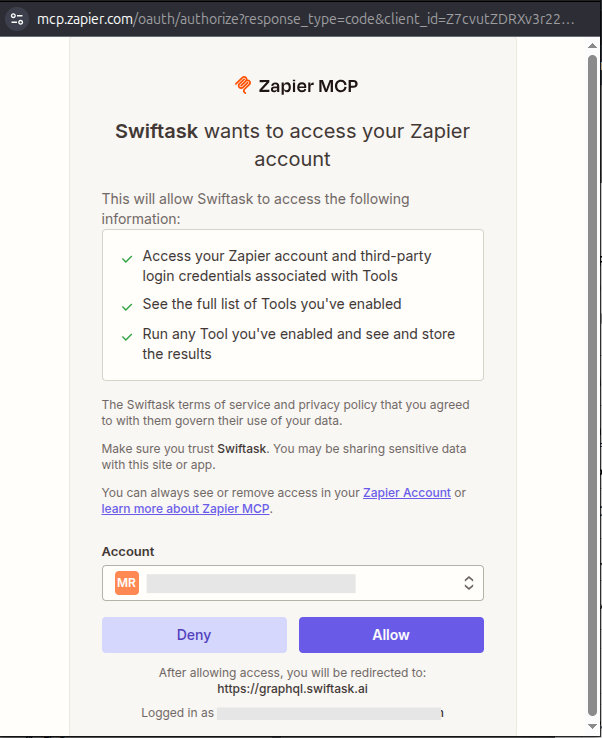
Option A: Authenticate with OAuth 2.0 (Auto)
Click Connect.
A new browser window opens asking you to authorize Swiftask to access your third-party account.
Review the permissions requested by the provider and click Allow.
You are automatically returned to Swiftask once authorization succeeds.
Option B: Authenticate with Bearer Token or API Key
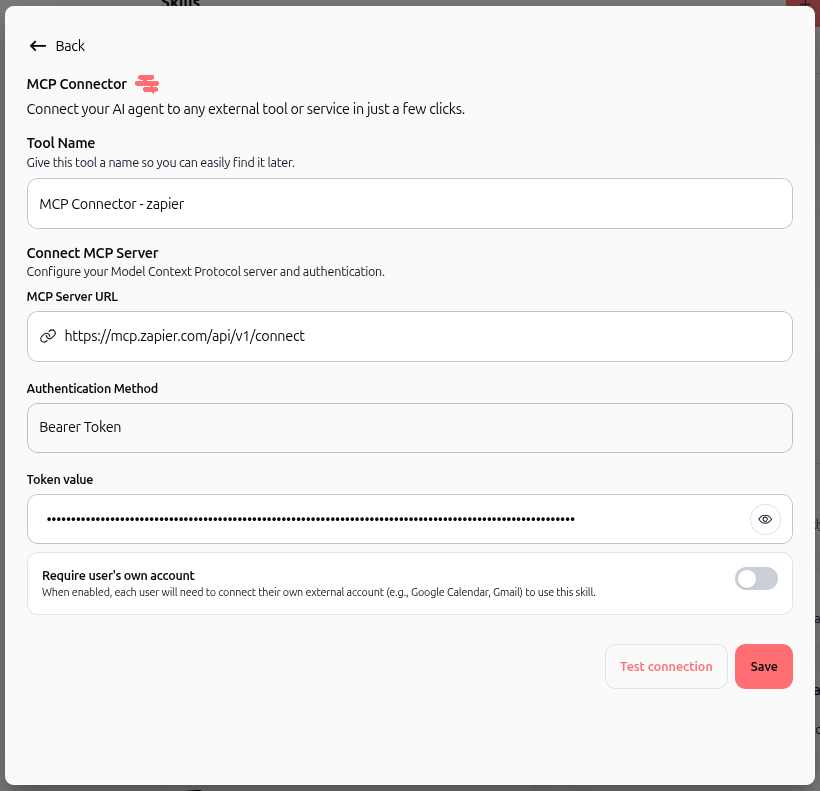
Copy your secret token or API key from your third-party account settings.
Paste the value into the Token value or API Key field in Swiftask.
5. Configure advanced OAuth settings (optional)
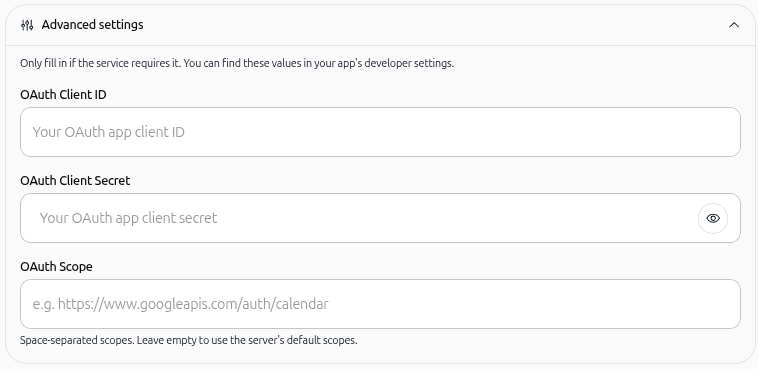
If your third-party service requires custom application credentials instead of default platform settings, click Advanced settings:
OAuth Client ID: Enter your custom client application ID.
OAuth Client Secret: Enter your custom client application secret.
OAuth Scope: Enter space-separated scopes requested by the server (leave empty to use default scopes).
6. Keep shared connection mode active (default)
Locate the Require user's own account toggle at the bottom of the configuration form.
By default, this toggle is turned OFF. Leaving it deactivated establishes a Shared connection:
The credentials you authenticated with are shared across the workspace for this agent.
Team members can use the agent and execute the connected third-party actions immediately.
Users do not need to sign in, configure tokens, or hold individual third-party licenses for this tool.
Keep this toggle OFF whenever you want the agent to operate using a single, unified workspace account.
7. Test connection and save
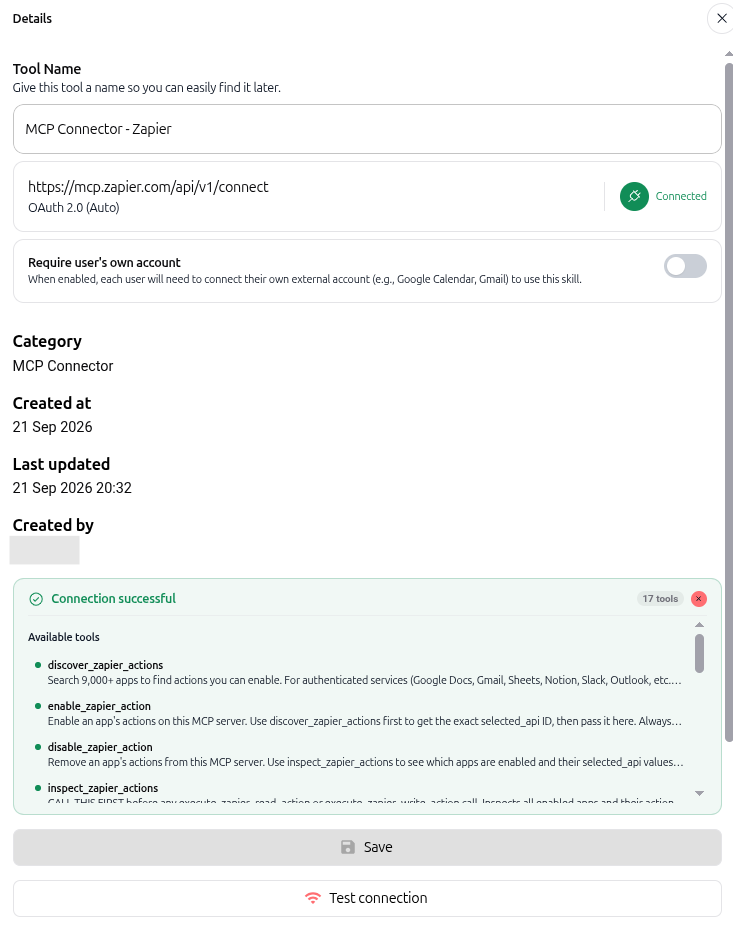
Click Test connection to verify that Swiftask can communicate with the external service.
Swiftask inspects the server and lists all available tools and actions (such as
discover_zapier_actionsorinspect_zapier_actions).Click Save to activate the skill on your agent.
8. Disconnect or manage connections across the workspace
You can disconnect an active connection directly from the skill, or manage all external accounts centrally.
Disconnecting directly from the skill
Open the tool configuration from your agent's skills list.
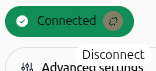
Click the green Connected badge.
Select Disconnect.
Managing external connections via account settings
To view, review, or revoke all active third-party connections in your workspace:
Click the Settings icon (gear) in the bottom-left corner of the main navigation panel.
Select Account Settings.
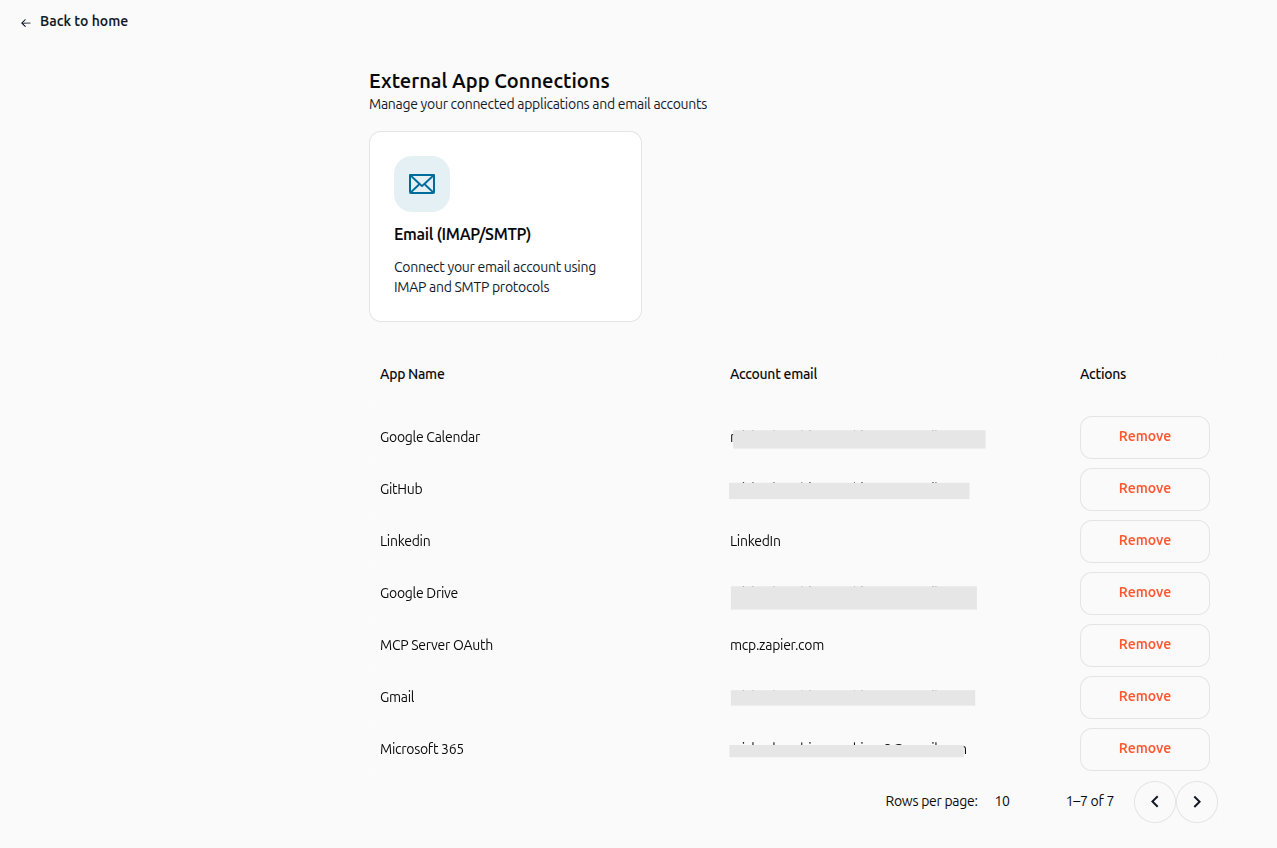
Under the Preferences & Tools section, click App Connections (or manage email protocols via connect SMTP/IMAP).
View the list of active services under External App Connections (including MCP Server OAuth, Gmail, GitHub, and Microsoft 365).
Click Remove next to any connection to revoke access workspace-wide.
Practical use cases
Company-wide workflow automation via shared Zapier MCP
A team connects a central Zapier MCP server to an operations agent. Every member of the department can ask the agent to search for actions, update project statuses, or trigger zaps without needing individual Zapier accounts.
Central documentation assistant via Notion MCP
A product team connects a Notion MCP server using a shared Bearer token. All designers and developers in the workspace can ask the agent to query specifications and update sprint boards using that shared connection.
Team customer support updates
A support agent connects to a shared CRM or ticketing system via MCP. Every support agent can ask the bot to look up client records and log resolution notes through one shared organizational connection.
Tips & best practices
Use a dedicated corporate account: For shared connections, authenticate using a generic company service account (such as
integrations@yourcompany.com) rather than a personal employee account.Always test connectivity: Click Test connection before saving to verify that credentials are valid and tools are correctly exposed.
Audit connections regularly: Check Account Settings → App Connections regularly to revoke obsolete or unneeded third-party connections.
Know when to switch modes: If a tool accesses private personal files, individual calendars, or personal mailboxes, turn ON Require user's own account instead.
Troubleshooting
Connection test fails
Cause: Incorrect endpoint URL, network connectivity issue, or invalid token/API key.
Fix: Verify the server URL format and ensure the Bearer token or API key copied from your provider dashboard is still active.
Authorization window does not finish loading
Cause: A browser popup blocker prevented the redirect from completing.
Fix: Enable popups for
app.swiftask.aiand restart the authorization by clicking Connect.
Teammates cannot run actions
Cause: The skill was saved with "Require user's own account" accidentally toggled ON, prompting each user for personal credentials.
Fix: Edit the skill on the agent, ensure the toggle is turned OFF, and click Save.
Additional resources
Skills (AI tools) – Browse the full catalog of available skills and capabilities.
Attach a skill to an agent – Learn about skill configuration, connectivity testing, and connection modes.
Was this helpful?
Still need help? Ask the team